Gary the Snail Crochet Pattern – Free Amigurumi Tutorial
If you’re into character-based amigurumi crochet patterns and enjoy a bit of a challenge, this one is definitely worth your time. It’s not the quickest make, but the result is totally worth it – Gary’s shell and expression come through perfectly.
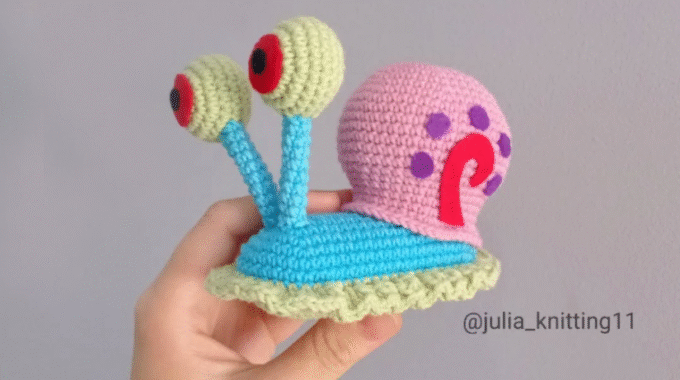
This cute amigurumi free pattern was originally created by @julia_knitting11 and is shared here with her kind permission, translated to help more crafters enjoy her amazing design.
So grab your yarn, hook, and maybe a cup of tea – and let’s bring this little snail to life!
Please kindly Pin the image before we start as it really helps. Thank you in advance!

Materials for Your Crochet Gary the Snail Project
This chapter may contain affiliate or referral links. Please read the Affiliate Disclosure for more information.
You can use any smooth yarn in a Sport or Fine weight, paired with a crochet hook that matches its thickness. Keep in mind – the thinner the yarn, the more compact and delicate your toy will be.
For this crochet snail free pattern, YarnArt Jeans was used – a Sport / Fine weight yarn (55% Cotton, 45% Acrylic). Each ball weighs 50 g and measures 160 m (175 yds). You’ll need three colors: very light green, blue, and pink.
If you’re looking for yarn alternatives, the Yarn Substitution Tool is a great resource to help you find similar smooth yarns for amigurumi.
Additional materials:
- Crochet hook size 2,5 mm
- Fiberfill stuffing
- Felt in red, black, and purple (for eyes and shell details)
- Yarn needle
- Scissors
- Stitch marker
- Glue

Abbreviations for the Amigurumi Snail Pattern (US Terms)
Here are the standard US crochet abbreviations used in this tutorial. If you’re just getting into free amigurumi crochet patterns, or want a quick reference, feel free to check out the Crochet Abbreviations guide to make following the pattern easier.
| Abbreviation | Meaning |
|---|---|
| ch/chs | chain/chains |
| inc | increase (two single crochets in one stitch) |
| inv dec | invisible decrease (see tutorial) |
| sc | single crochet |
| sl st | slip stitch |
| st/sts | stitch/stitches |
| […] x | repeat the instructions in brackets x times |
| (…) | total number of stitches in the round |


Let’s Start the Gary the Snail Crochet Pattern
Shell
Work in continuous rounds using pink yarn, placing a stitch marker in the first stitch of each round. Stuff as you go.
R1: Chain 6, start from the 2nd ch from hook: inc, 3 sc, 3 sc in last ch, work along the other side of the chain: 4 sc (12)
R2: inc x 2, 3 sc, inc x 3, 3 sc, inc (18)
R3: [1 sc, inc] x 2, 4 sc, [inc, 1 sc] x 2, inc, 4 sc, inc (24)
R4: [2 sc, inc] x 2, 5 sc, [inc, 2 sc] x 2, inc, 5 sc, inc (30)
R5: [3 sc, inc] x 2, 6 sc, [inc, 3 sc] x 2, inc, 6 sc, inc (36)
R6: Sc in each st around (36)
R7: [4 sc, inc] x 2, 7 sc, [inc, 4 sc] x 2, inc, 7 sc, inc (42)
R8: [5 sc, inc] x 2, 8 sc, [inc, 5 sc] x 2, inc, 8 sc, inc (48)
R9-15: sc in each st around (48, 7 rounds)
R16: [5 sc, inv dec] x 2, 8 sc, [inv dec, 5 sc] x 2, inv dec, 8 sc, inv dec (42)
R17: [4 sc, inv dec] x 2, 7 sc, [inv dec, 4 sc] x 2, inv dec, 7 sc, inv dec (36)
R18-20: Sc in each st around (36)
R21: [5 sc, inc] x 6 (42)
R22: [6 sc, inc] x 6 (48)
Fasten off, leaving a long tail for sewing.
Body
The body is made of two parts – a blue upper part and a very light green lower part – which are then sewn together. Begin with the upper part using blue yarn. Work in continuous rounds, placing a stitch marker in the first stitch of each round.
R1: Chain 19, start from the 2nd ch from hook: 16 sc, 3 sc in last ch, work along the other side of the chain: 17 sc (38)
R2: inc x 2, 16 sc, inc x 3, 16 sc, inc (44)
R3: [1 sc, inc] x 2, 17 sc, [inc, 1 sc] x 2, inc, 17 sc, inc (50)
R4: [2 sc, inc] x 2, 18 sc, [inc, 2 sc] x 2, inc, 18 sc, inc (56)
R5: [3 sc, inc] x 2, 19 sc, [inc, 3 sc] x 2, inc, 19 sc, inc (62)
R6-7: sc in each st around (62), switch to very light green yarn on the last stitch.
You can learn how to change colors seamlessly by reading the tutorial: How to Invisible Color Change in Amigurumi.
R8: sc in each st around (62)
R9: Work in FLO: 2 dc in each st (inc) (124)
Make the lower part in light green yarn: repeat rounds 1–5. Sew the two parts together: use the remaining back loops from the blue part and both loops from the green part. Stuff the body before closing it completely.
Eyes
Work in continuous rounds using light green yarn, placing a stitch marker in the first stitch of each round. Stuff as you go.
R1: Into the magic ring, 6 sc, then pull the yarn tail to close the ring (6)
R2: inc in each st around (12)
R3: [1 sc, inc] x 6 (18)
R4: [2 sc, inc] x 6 (24)
R5-7: sc in each st around (24)
R8: [2 sc, inv dec] x 6 (18)
R9: [1 sc, inv dec] x 6 (12)
R10: inv dec x 6 (12)
Fasten off, pull the hole closed, and weave in the end.
You can learn how to neatly close the hole by following the tutorial: How to Close a Hole in Amigurumi.
Eye Stalks
Work in continuous rounds using blue yarn, placing a stitch marker in the first stitch of each round.
R1: Chain 7, join to form a ring with sl st (7)
R2-11: sc in each st around (7)
Fasten off, leaving a long tail for sewing.
Assembly
1. Sew the stalks to the eyes and then attach them to the body. Sew the shell to the body as shown in the photo below.
2. For the eyes, cut out red felt circles that match the size of the eyes, and smaller black circles about half the size of the red ones. Attach them to the eyes using glue or by sewing.
3. For the shell, cut five purple felt circles and a swirl-shaped element out of red felt. Attach them to the shell by gluing or sewing. Use the finished snail photo below as a reference for sizing and placement.

Well Done! Your Crochet Gary the Snail Is Finished!
You did it – your Gary the Snail is ready! Whether you’re a long-time amigurumi fan or just starting your collection, I hope you enjoyed making this toy as much as I enjoyed sharing it.
Thanks for following along – and if you’re looking for more fun free amigurumi crochet patterns, don’t forget to subscribe. I’d love to see your finished snail! Feel free to share your photos in my Facebook group, Ami & Hook Society.
Got questions? Just shoot me a message. I’m always around!


Comments (0)