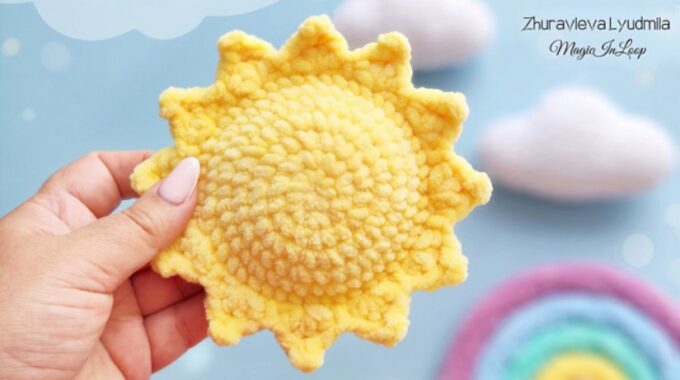
Crochet Sun Plushie – Free Amigurumi Pattern
Learn how to crochet a cheerful sun plushie 🌞 with this free amigurumi sun pattern and step-by-step tutorial. This cute crochet sun is a quick and beginner-friendly project for handmade gifts, nursery decor, bag charms, plush toys, or simply adding something bright and happy to your crochet collection.
Before we begin, thank you for visiting GorbunovaDolls – a place where I share detailed amigurumi patterns, crochet doll designs, and selected free tutorials from talented designers, translated with permission.

Pin this crochet sun plushie pattern to your crochet board so you can easily find it when you’re ready to make a cheerful amigurumi project.
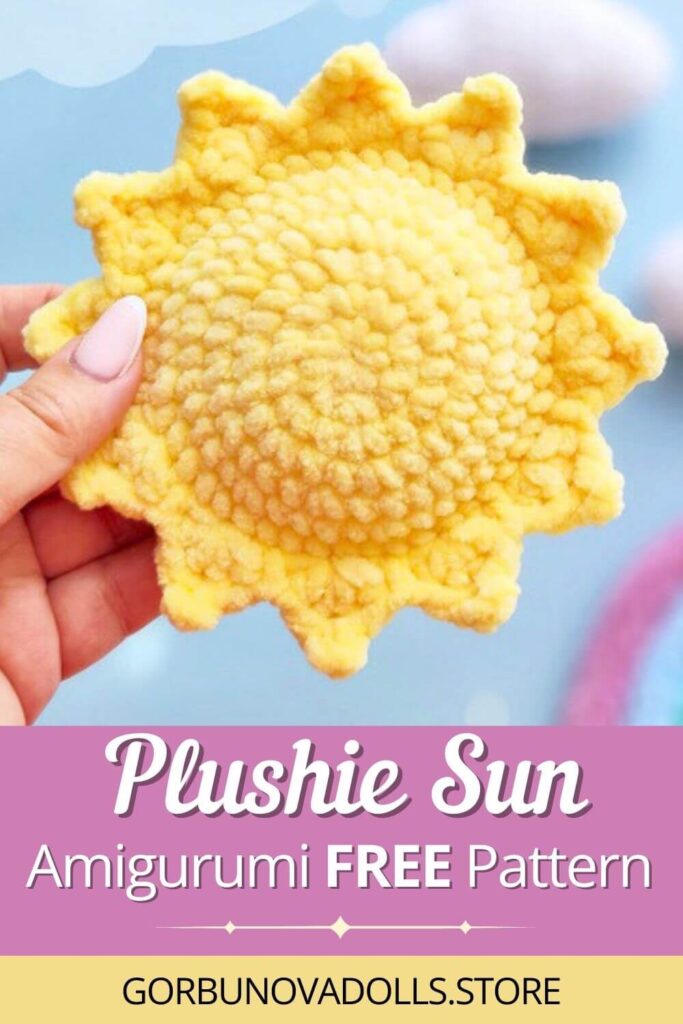
This crochet sun is made from two simple round pieces that are joined together, lightly stuffed, and finished with a decorative sun-ray border. The construction is easy to follow, and the result is a sweet little sun that can be used as a plush toy, cheerful decoration, or small handmade gift.
The original sun was made with plush yarn for a soft and cozy result. For my step-by-step tutorial photos, I used smooth YarnArt Jeans yarn so the stitches are easier to see, especially in the joining and sun-ray sections.
Designer Credit
This free crochet sun pattern was originally designed by Zhuravleva Lyudmila (@liska_nbrand) and is shared here with her kind permission. I translated and prepared the instructions in English, and I photographed my own making process to help you follow the tutorial step by step.
If you enjoy this free English translation and photo tutorial, you can support my work with a small Ko-fi donation. Thank you!
Pattern Details
- Skill Level: Beginner-friendly / Easy
- Finished Size: depends on your yarn and hook size
- Crochet Terms: US terms
- Construction: the sun is made from two round crochet pieces, joined together with single crochet, lightly stuffed, and finished with a decorative sun-ray border
- Best For: nursery decor, baby gifts, plush toys, bag charms, cheerful handmade decorations, and cute amigurumi projects
- Tutorial Photos: shown with smooth cotton-blend yarn so the stitches are easier to see
- Original Designer: Zhuravleva Lyudmila (@liska_nbrand)
- English Translation & Tutorial Photos: GorbunovaDolls
Materials You’ll Need
This section may contain affiliate links, including Amazon affiliate links. If you purchase through these links, I may earn a small commission at no extra cost to you. Thank you for supporting my free patterns.
You can use any plush yarn with a crochet hook suitable for that yarn. The thicker the yarn, the larger and softer your crochet sun will be.
For the original sun, Himalaya Dolphin Baby Chenille Yarn was used – a 100% polyester super bulky baby amigurumi yarn. Each ball weighs 100 g / 3.5 oz and measures 120 m / 132 yds. The color used in the original tutorial is 80313 Yellow.
Photo Note: For the step-by-step tutorial photos, I used smooth YarnArt Jeans yarn so you can clearly see where to insert the hook and how the stitches are formed. You can make the sun with plush yarn for a softer, squishier result, but the stitches may be harder to see while crocheting.
If you want to use a different yarn, choose a yarn that gives you neat, tight stitches for amigurumi. The Yarn Substitution Tool is a helpful resource for finding yarns with a similar weight, fiber content, and texture.
You will need:
- yellow plush yarn or smooth cotton/cotton-blend yarn
- 3 mm crochet hook, or a hook suitable for your yarn
- fiberfill stuffing
- yarn needle
- scissors
- stitch marker
Gauge and Size Notes
Gauge is not critical for this pattern. The most important thing is to keep your stitches tight enough so the stuffing does not show through. Your finished crochet sun may be larger or smaller depending on your yarn, hook size, and tension.
If you use plush yarn, the finished sun will be larger, softer, and more squishy. If you use smooth cotton-blend yarn, the finished sun will be smaller and the stitches will be easier to see.
For reference, my crochet sun made with YarnArt Jeans and a 2.5 mm hook measures approximately 9 cm / 3.5 in across.
Crochet Abbreviations Used in This Pattern
This pattern is written in standard US crochet terms. You can also check my Crochet Abbreviations guide if you need help with any of the stitches.
| Abbreviation | Meaning |
|---|---|
| ch/chs | chain/chains |
| dc | double crochet |
| hdc | half double crochet |
| inc | increase (two single crochets in one stitch) |
| sc | single crochet |
| sl st | slip stitch |
| st/sts | stitch/stitches |
| […] x | repeat the instructions in brackets x times |
| (…) | total number of stitches in the round |
Pattern Notes
- The sun is crocheted from two identical round pieces.
- Use a stitch marker to mark the first stitch of each round.
- The two round pieces are placed together with the wrong sides facing each other.
- The pieces are joined with single crochet stitches.
- Add stuffing before closing the sun completely.
- The sun rays are crocheted as a decorative border around the edge.
- If you use plush yarn, the stitches may be harder to see, but the construction steps are the same.
Love detailed amigurumi patterns?
If you enjoy cute crochet projects like this one, you may also love my premium amigurumi doll patterns. Each PDF pattern is carefully designed with clear step-by-step instructions, helpful photos, and a polished finished result in mind.


Pattern Instructions
Sun Pieces
The sun is crocheted from two identical pieces, which are then joined together. Crochet in rounds, always placing the stitch marker in the first stitch of the round.
R1: Into the magic ring, 8 single crochets, then pull the yarn tail to close the ring (8)
R2: inc in each st around (16)
R3: [sc, inc] x 8 (24)
R4: [2 sc, inc] x 8 (32)
R5: sc, [inc, 3 sc] x 7, inc, 2 sc (40)
R6: [4 sc, inc] x 8 (48)
R7: 2 sc, [inc, 5 sc] x 7, inc, 3 sc (56)
Fasten off and cut the yarn on the first piece. Crochet the second piece the same way, but do not fasten off or cut the yarn. You will continue with this working yarn to join the two pieces together.

Joining the Sun Pieces
Place both round pieces together with the wrong sides facing each other. Insert your hook through both loops of both pieces and crochet them together with single crochet stitches.

Crochet around the edge with 56 single crochet stitches, joining both pieces together.

When you have about 8–10 stitches left to finish, lightly stuff the sun with fiberfill.

Finish crocheting the pieces together. Do not cut the yarn. Next, continue with the sun rays.
Sun Rays
Without cutting the yarn, crochet the decorative sun rays around the edge.
Ray repeat: Skip 1 stitch, then work the following into the next stitch: 1 hdc, 1 dc, ch 3, sl st into the third chain from the hook, 1 dc, and 1 hdc. Skip 1 stitch, then make 1 sl st.
To form the small point at the top of the ray, ch 3. The arrow shows where to work the slip stitch.


Repeat the ray 13 more times. You should have 14 sun rays in total.
Fasten off and cut the yarn. Weave in the end inside the sun.
Your Crochet Sun Is Finished!
Congratulations – your crochet sun is ready! This cheerful little amigurumi makes a sweet handmade decoration, nursery accent, baby gift, bag charm, or cute plush toy.

If you have any questions while following this tutorial, feel free to contact me here and I’ll do my best to help.
I hope you enjoyed this free crochet sun pattern. If you make your own sun, I’d love to see it! Tag me on Instagram @gorbunova.dolls or share your photo in my Facebook group, Ami & Hook Society.
Want to crochet something more detailed?
Explore my premium amigurumi doll patterns – beautifully structured PDF patterns with clear instructions, helpful step-by-step photos, and charming finished dolls you’ll be proud to make.
Pattern Credit & Permissions
This pattern was originally designed by Zhuravleva Lyudmila (@liska_nbrand) and is shared here as an English translation with the designer’s permission. Please do not copy, repost, translate, or redistribute this pattern without permission from the original designer.


Comments (0)