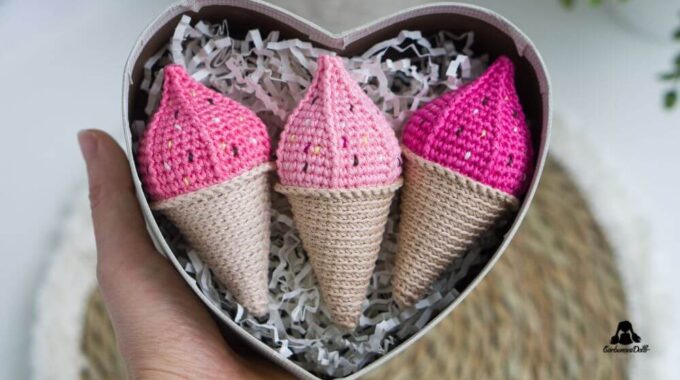
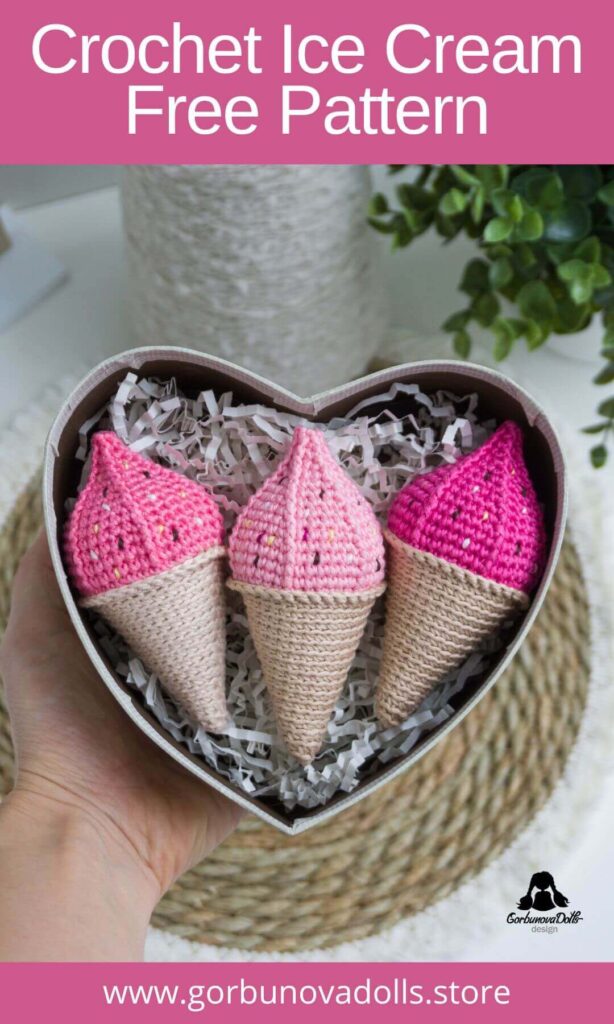
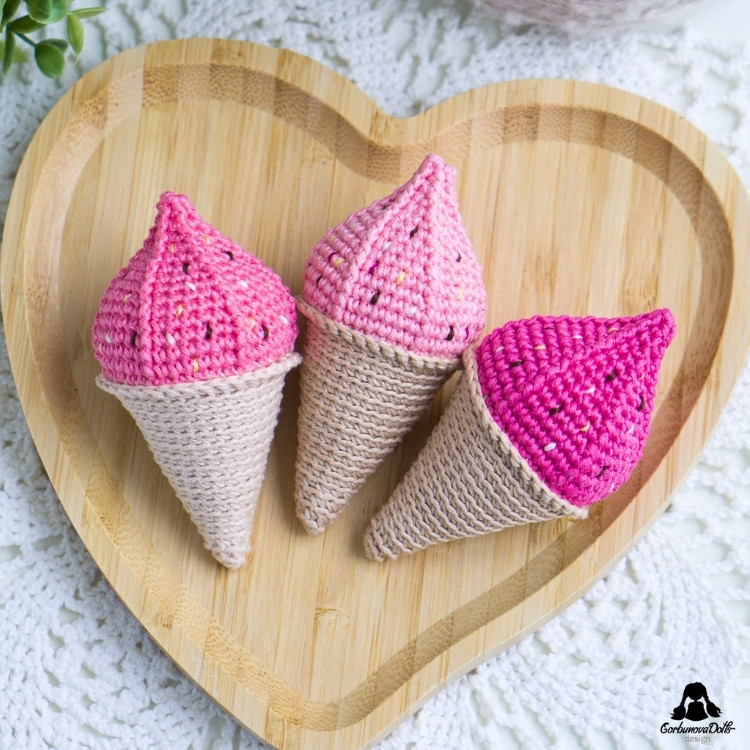
Crochet Ice Cream – Free Amigurumi Pattern
Learn how to crochet a sweet ice cream with this free amigurumi pattern and step-by-step tutorial. This cute crochet ice cream is a fun small project for handmade gifts, keychains, summer decorations, play food, party favors, or a tiny dessert detail for your crochet collection.
Before we begin, thank you for visiting GorbunovaDolls – a place for detailed amigurumi patterns, crochet dolls, and cute handmade projects created with care.

Pin this crochet ice cream pattern to your crochet board so you can easily find it when you’re ready to make a sweet summer amigurumi project.
This crochet ice cream is worked in one piece from the cone upward, with no sewing required for the main shape. The cone is crocheted in back loops for texture, the scoop is shaped with front post single crochet stitches, and the sprinkles are embroidered at the end.
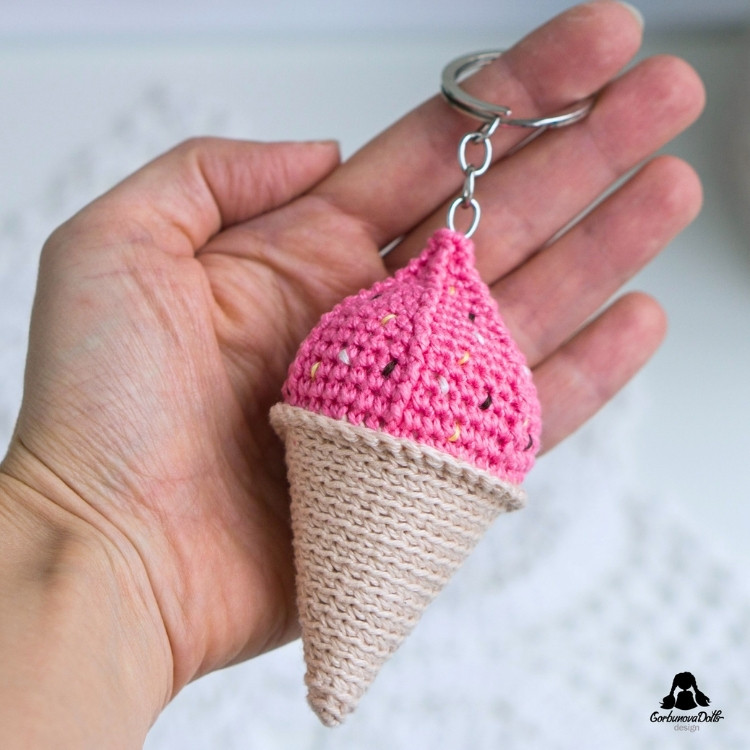
It is a cute summer crochet project that can be used as a toy, keychain, gift topper, play food, or sweet handmade decoration. If you prefer to work offline, the printable PDF version is available in my shop.
Pattern Details
- Skill Level: Intermediate
- Finished Size: approximately 10 cm / 4 in high when made with sport weight cotton and a 2.5 mm hook
- Crochet Terms: US terms
- Construction: the ice cream is crocheted in one piece from the cone upward, then finished with a crocheted hem and embroidered sprinkles
- Best For: keychains, play food, summer decorations, party favors, sweet-themed gifts, doll props, and cute amigurumi projects
- PDF Available: yes, in a printable ad-free format
- Pattern Design & Tutorial Photos: GorbunovaDolls
Materials You’ll Need
This section may contain affiliate links, including Amazon affiliate links. If you purchase through these links, I may earn a small commission at no extra cost to you. Thank you for supporting my free patterns.
For my crochet ice cream, I used Schachenmayr Catania – a sport weight / fine cotton yarn made of 100% cotton. Each skein is 50 g / 125 m / 137 yds. The colors used for my sample are 00436 beige for the cone and 00225 pink for the scoop.
You can use any similar cotton or cotton-blend yarn in two colors: one color for the cone and one color for the ice cream scoop. Use a hook that gives you tight stitches so the stuffing does not show through.
If you want to use a different yarn, choose a smooth cotton or cotton-blend yarn that gives you neat, defined stitches. The Yarn Substitution Tool is a helpful resource for finding yarns with a similar weight, fiber content, and texture.
You will need:
- sport weight / fine cotton yarn in two colors
- 2.5 mm crochet hook
- fiberfill stuffing
- embroidery floss in different colors for sprinkles
- yarn needle
- scissors
- stitch marker
- optional: split ring or keychain clasp if you want to turn the ice cream into a keychain
Gauge and Size Notes
Gauge is not critical for this pattern, but it can help if you want your ice cream to be close to the sample size. A 10-stitch by 10-row swatch in single crochet measures approximately 3.5 × 3.5 cm / 1.38 × 1.38 in.
With Schachenmayr Catania and a 2.5 mm hook, the finished crochet ice cream measures approximately 10 cm / 4 in high. You can make a larger or smaller ice cream by changing your yarn weight, hook size, or both.
You can also turn the finished ice cream into a cute keychain by attaching a split ring or keychain clasp through the top stitches.
Crochet Abbreviations Used in This Pattern
This pattern is written in standard US crochet terms. You can also check my Crochet Abbreviations guide if you need help with any of the stitches.
| Abbreviation | Meaning |
|---|---|
| blo | back loop only (see tutorial) |
| ch/chs | chain/chains |
| FPsc | front post single crochet |
| inc | increase (two single crochets in one stitch) |
| sc | single crochet |
| sl st | slip stitch |
| st/sts | stitch/stitches |
| […] x | repeat the instructions in brackets x times |
| (…) | total number of stitches in the round |
Pattern Notes
- The ice cream is crocheted in one piece from the cone upward.
- Work in continuous rounds and use a stitch marker to mark the first stitch of each round.
- The cone is worked in back loops only.
- The cone looks neater if you use X-shaped single crochet stitches.
- The scoop is worked mostly through both loops with V-shaped single crochet stitches.
- The scoop shaping uses front post single crochet stitches.
- Stuff the ice cream firmly as you go, but do not overstuff the top of the scoop.
- Change color in the last step of the last stitch of the cone.
- The hem is crocheted into the remaining front loops of the last cone round.
- The sprinkles are embroidered at the end with embroidery floss.
To learn how to change colors seamlessly, check out my Invisible Color Change in Amigurumi tutorial.
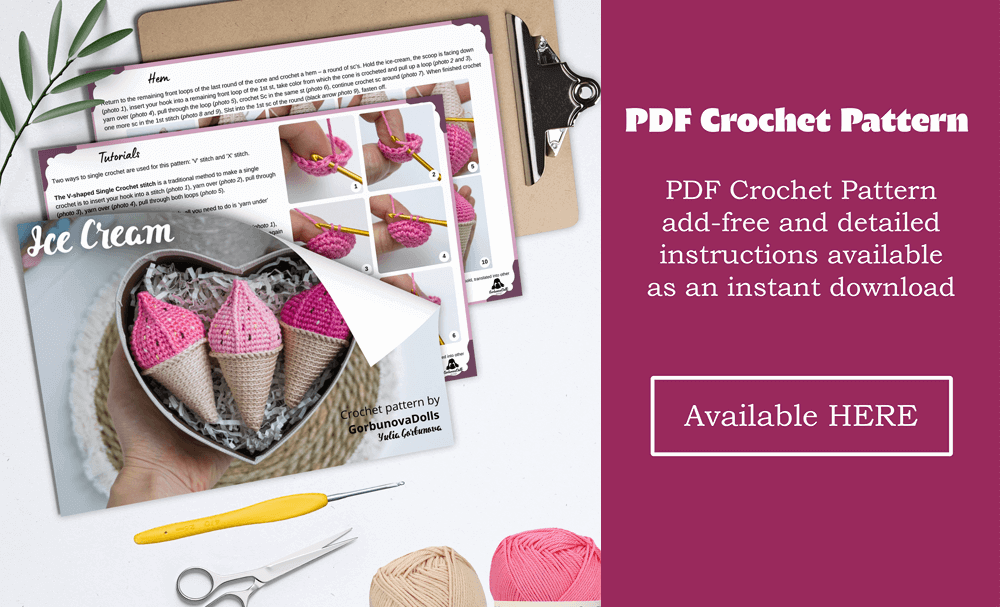
Get the Printable PDF Pattern
Prefer to crochet offline? The printable PDF version of this crochet ice cream pattern includes the full instructions in a clean, ad-free format that you can download, save, print, and keep forever.
If you enjoy this free pattern, you can support my work by purchasing the ad-free PDF version from my shop. Your support helps me continue creating detailed free crochet patterns. Thank you!
Love sweet-themed crochet patterns?
The crochet macaron pattern is a perfect match for your ice cream if you want to make a cute dessert-themed set.
Love detailed amigurumi patterns?
If you enjoy cute crochet projects like this one, you may also love my premium amigurumi doll patterns. Each PDF pattern is carefully designed with clear step-by-step instructions, helpful photos, and a polished finished result in mind.


Pattern Instructions
Cone
The ice cream is crocheted in one piece from the cone upward. You can use brown, beige, or peach yarn for the cone.
R1: start 6 sc in a double magic ring (6)
All the following cone rounds are worked in back loops only, using X-shaped single crochet stitches. You can crochet with the classic V-shaped single crochet stitch, but for a neater cone texture, I recommend using the X-shaped single crochet stitch.
R2: blo 1 sc, inc, 2 sc, inc, 1 sc (8)
R3: blo 2 sc, inc, 3 sc, inc, 1 sc (10)
R4: blo 2 sc, inc, 4 sc, inc, 2 sc (12)
R5: blo 3 sc, inc, 5 sc, inc, 2 sc (14)
R6: blo 3 sc, inc, 6 sc, inc, 3 sc (16)
R7: blo 4 sc, inc, 7 sc, inc, 3 sc (18)
R8: blo 4 sc, inc, 8 sc, inc, 4 sc (20)
R9: blo 5 sc, inc, 9 sc, inc, 4 sc (22)
R10: blo 5 sc, inc, 10 sc, inc, 5 sc (24)
R11: blo 6 sc, inc, 11 sc, inc, 5 sc (26)
R12: blo 6 sc, inc, 12 sc, inc, 6 sc (28)
R13: blo 7 sc, inc, 13 sc, inc, 6 sc (30)
R14: blo 7 sc, inc, 14 sc, inc, 7 sc (32)
R15: blo 8 sc, inc, 15 sc, inc, 7 sc (34)
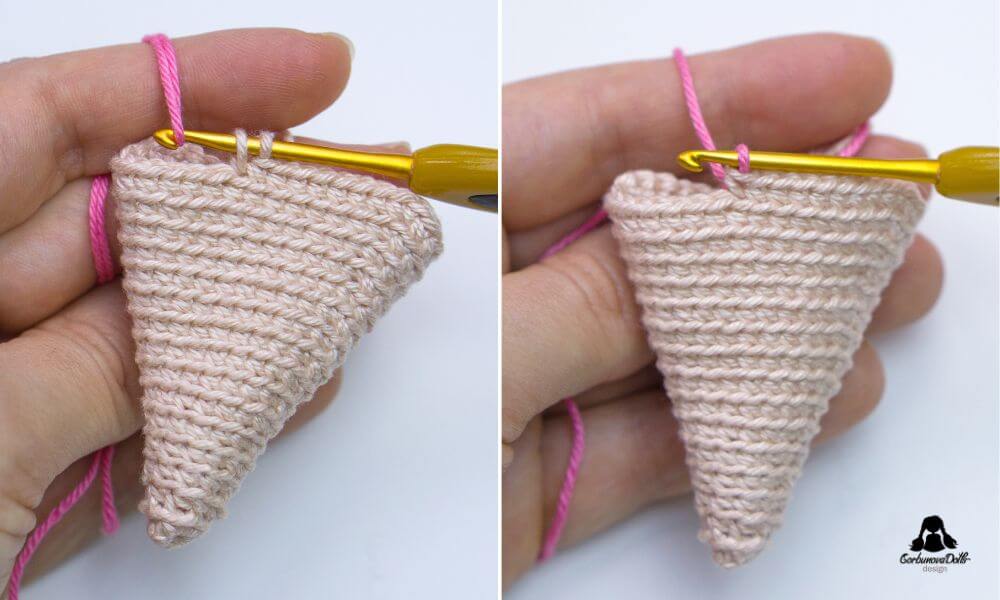
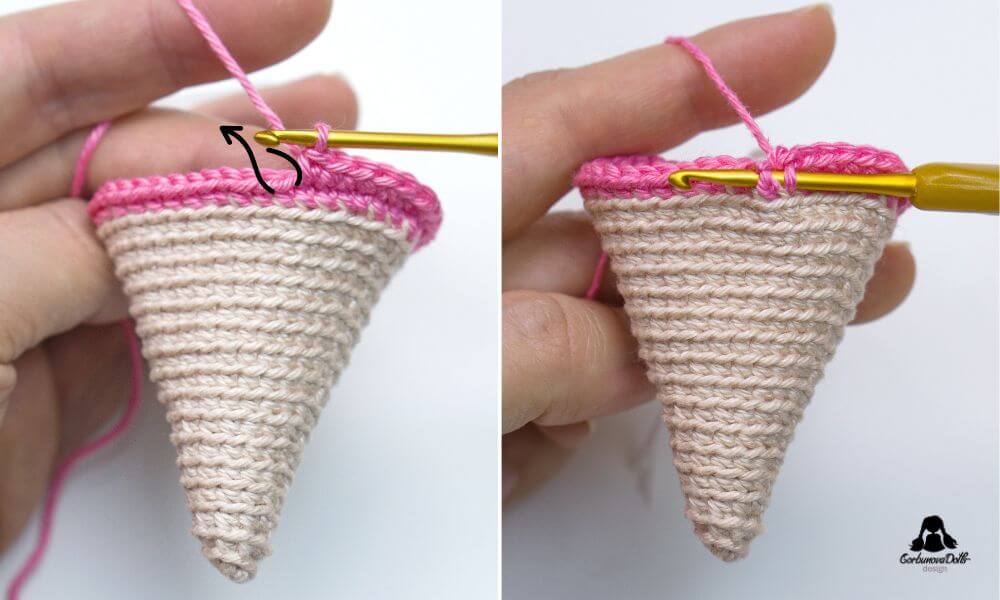
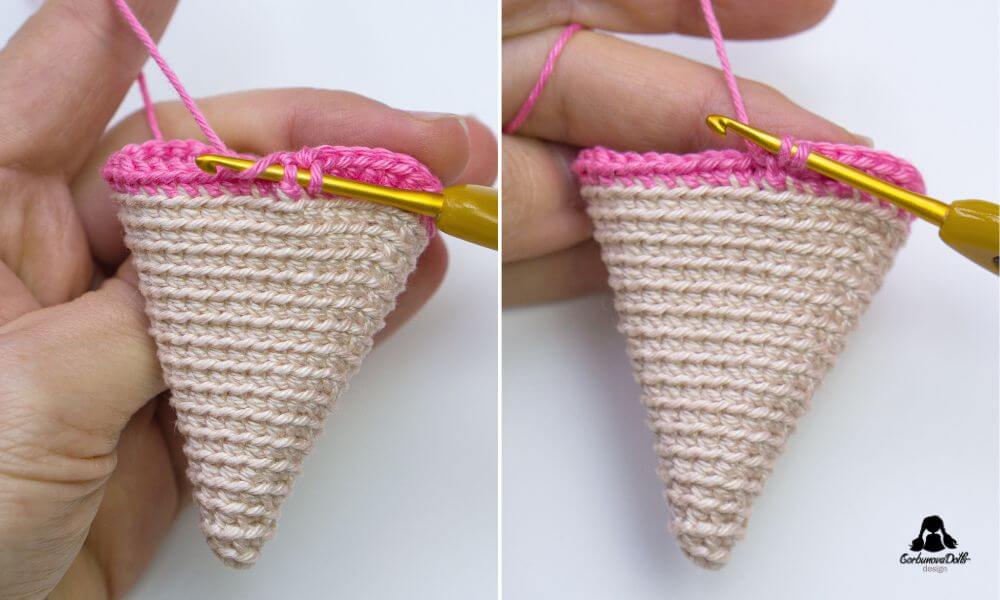
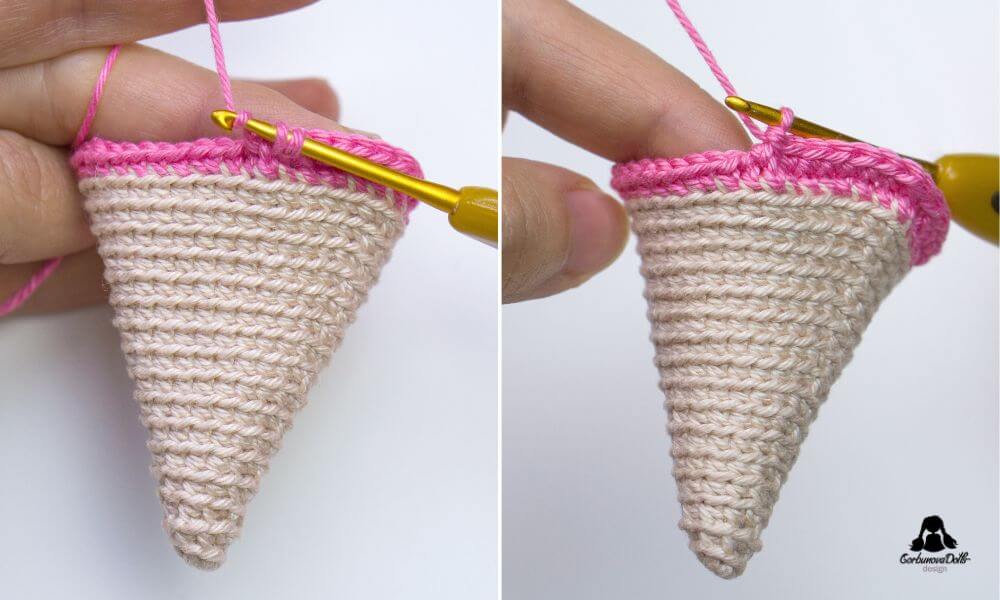
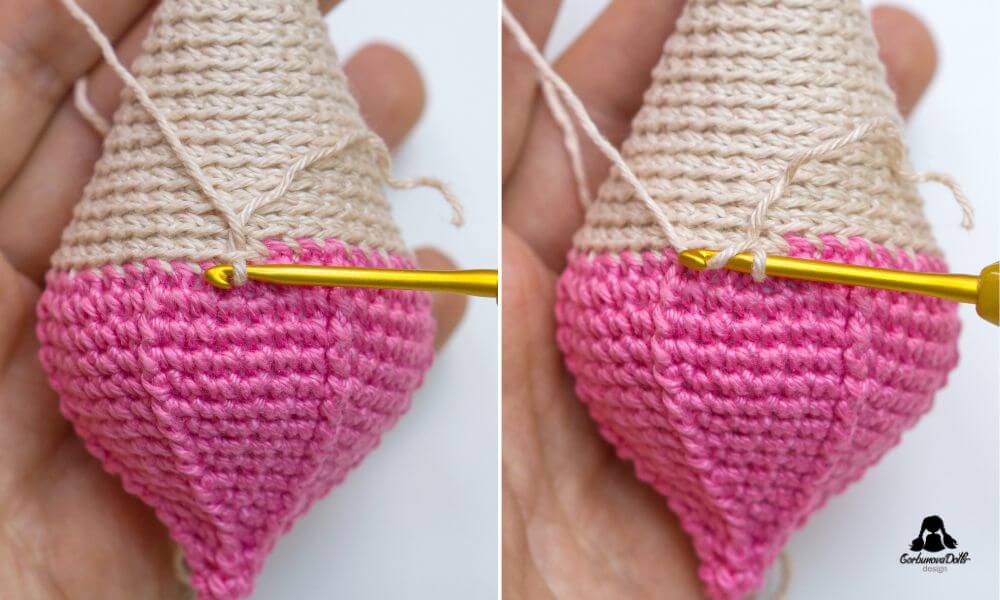
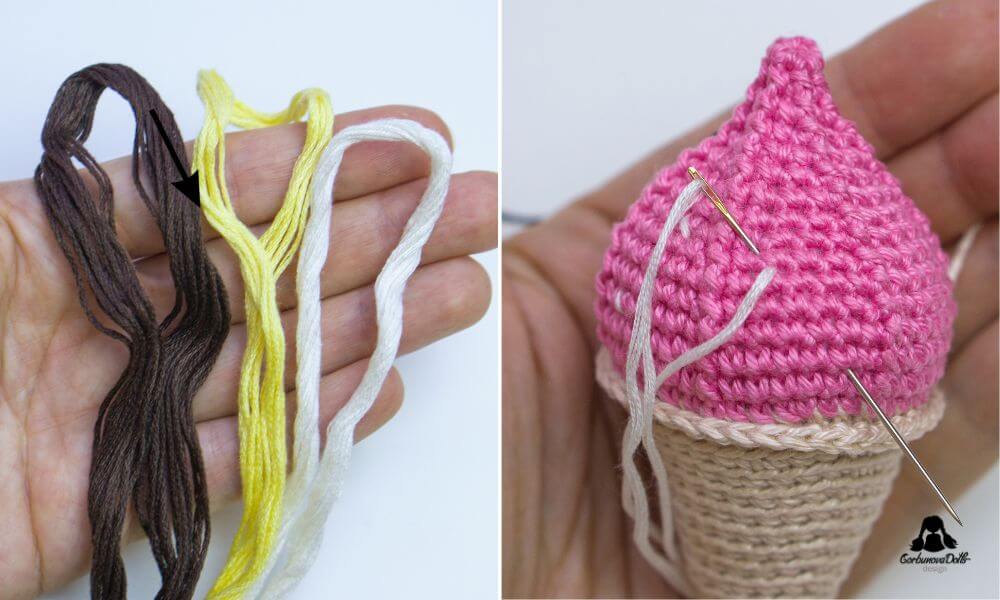
R16: blo 8 sc, inc, 16 sc, inc, 8 sc (36), connect the scoop color in the last step of the last sc (see Photos 1 and 2).
Scoop of Ice Cream
R1: blo [5 sc, inc] x 6 (42)
All the following scoop rounds are crocheted through both loops with V-shaped single crochet stitches. If your stitches are usually loose, you may continue using X-shaped single crochet stitches to keep the fabric tighter.
How to Make a Front Post Single Crochet
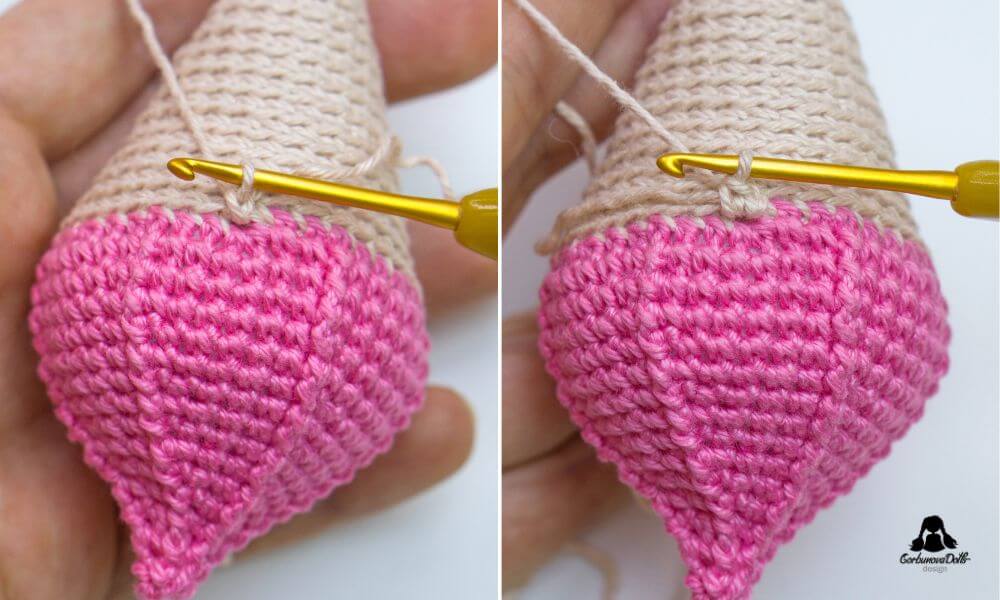
For the next rounds, you will need to crochet front post single crochet stitches.
Insert your hook from front to back between the posts of the 1st and 2nd stitches of the round below, and then from back to front between the posts of the 2nd and 3rd stitches (see Photos 3 and 4).
Yarn over (see Photo 5). Pull the yarn back (see Photo 6).
Yarn over again (see Photo 7). Pull the yarn through both loops. Your front post single crochet is complete (see Photo 8).
R2-4: 2 sc, 1 FPsc, be careful not to skip the stitch right after FPsc (see black arrow in Photo 9), [6 sc, 1 FPsc] x 5, 4 sc (42, see Photo 10).
R5: 2 sc, 1 FPsc, [sk 1 st (see Photo 11), 5 sc, 1 FPsc] x 5, sk 1 st, 3 sc (36)
R6: 2 sc, 1 FPsc, [5 sc, 1 FPsc] x 5, 3 sc (36)
R7: 2 sc, 1 FPsc, [sk 1 st, 4 sc, 1 FPsc] x 5, sk 1 st, 2 sc (30)
R8: 2 sc, 1 FPsc, [4 sc, 1 FPsc] x 5, 2 sc (30)
R9: 2 sc, 1 FPsc, [sk 1 st, 3 sc, 1 FPsc] x 5, sk 1 st, 1 sc (24)
Stuff firmly.
R10: 2 sc, 1 FPsc, [3 sc, 1 FPsc] x 5, 1 sc (24)
R11: 2 sc, 1 FPsc, [sk 1 st, 2 sc, 1 FPsc] x 5 (18)
R12: sk 1 st, 2 sc, 1 FPsc, [2 sc, 1 FPsc] x 5 (18)
Stuff a little more.
R13: sk 1 st, 1 sc, 1 FPsc, [sk 1 st, 1 sc, 1 FPsc] x 5 (12)
R14: [1 sc, 1 FPsc] x 6 (12)
R15: [sk 1 st, 1 FPsc] x 6 (6), do not stuff the top of the scoop. Fasten off (see Photo 12).

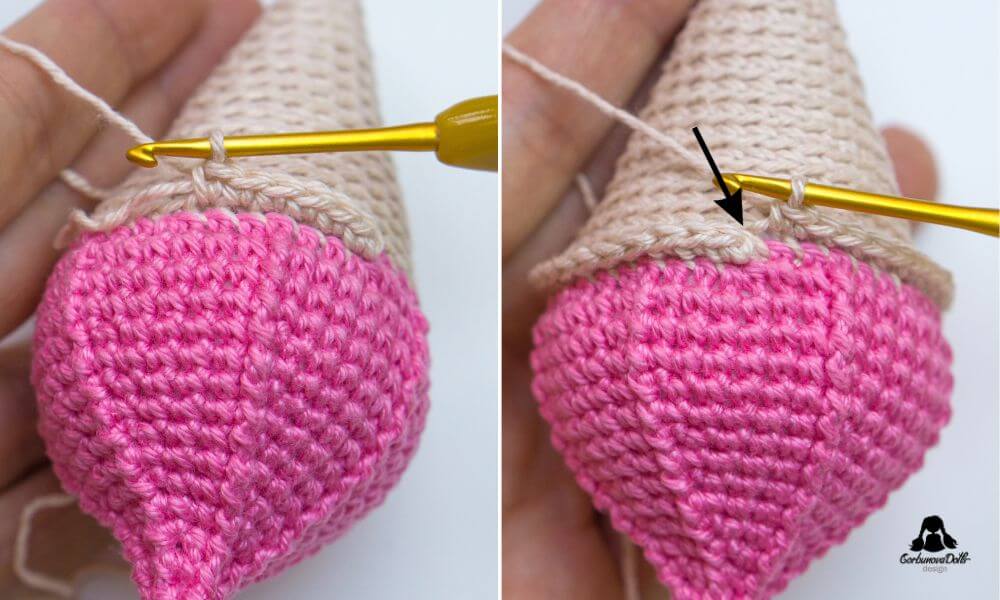
Hem
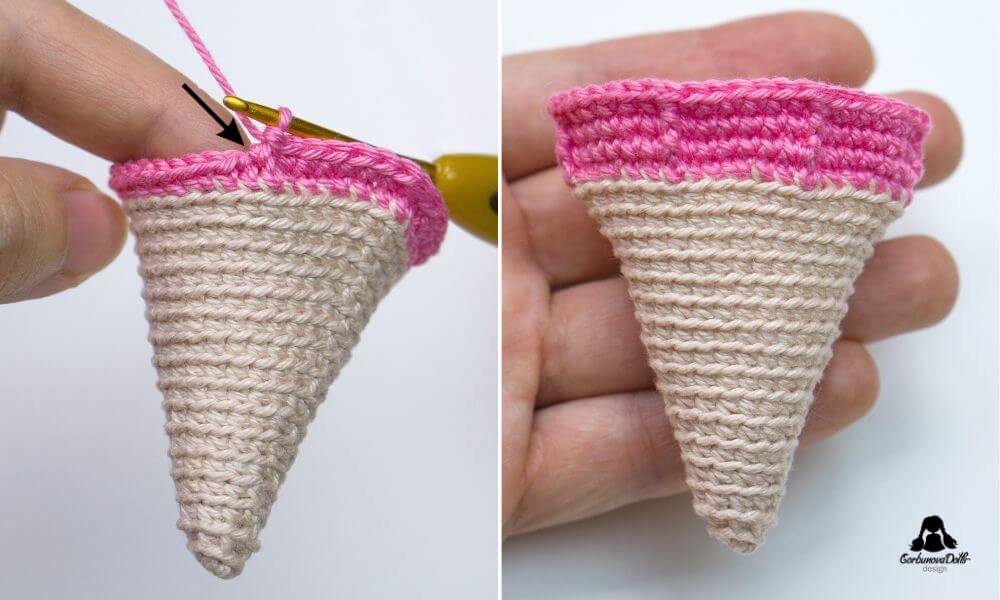
Return to the remaining front loops of the last round of the cone and crochet a hem with single crochet stitches.
Hold the ice cream with the scoop facing down (see Photo 1). Insert your hook into the remaining front loop of the first stitch, take the cone color yarn, and pull up a loop (see Photos 2 and 3). Yarn over (see Photo 4).
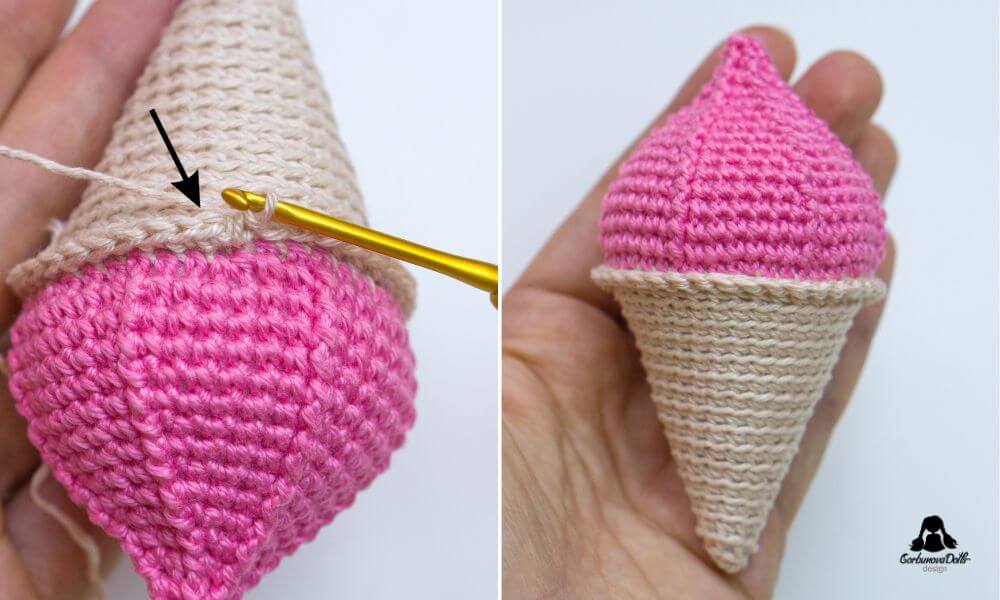
Pull through the loop (see Photo 5), then crochet sc in the same stitch (see Photo 6).
Continue crocheting sc around (see Photo 7). When finished, crochet one more sc in the first stitch (see black arrow in Photo 8). Then sl st into the first sc of the round (see black arrow in Photo 9) and fasten off. The hem is ready (see Photo 10).
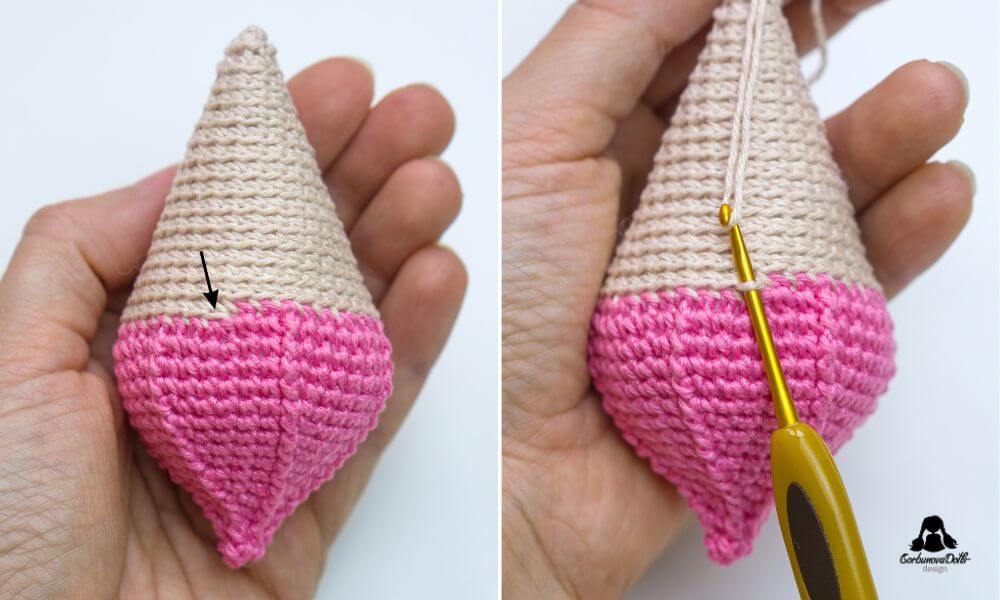
Decoration
If you want to add sprinkles, use a yarn needle and embroidery floss in different colors to make small straight stitches on the scoop (see Photos 1 and 2).
Your Crochet Ice Cream Is Finished!
Congratulations – your crochet ice cream is ready! This sweet little amigurumi dessert is perfect as a keychain, summer decoration, play food, party favor, doll prop, or cute handmade gift.
If you have any questions while following this tutorial, feel free to contact me and I’ll do my best to help.
I hope you enjoyed this free crochet ice cream pattern. If you make your own ice cream, I’d love to see it! Tag me on Instagram @gorbunova.dolls or share your photo in my Facebook group, Ami & Hook Society.
Want the printable version?
The ad-free PDF includes this crochet ice cream pattern in a clean printable format so you can download it, save it, print it, and keep it forever.
Want to crochet something more detailed?
Explore my premium amigurumi doll patterns – beautifully structured PDF patterns with clear instructions, helpful step-by-step photos, and charming finished dolls you’ll be proud to make.
Copyright
© GorbunovaDolls. All rights reserved. This crochet ice cream pattern may not be published, resold, reproduced, shared, translated, or altered without prior written permission from the author. For more details, please visit Copyright and Intellectual Property Rights.
Selling Finished Items
You may sell finished items made from this pattern. You are welcome to make as many finished ice creams as you like for personal use, charity, or small handmade sales. However, the pattern itself may not be copied, reproduced, redistributed, translated, or resold.


Comments (0)