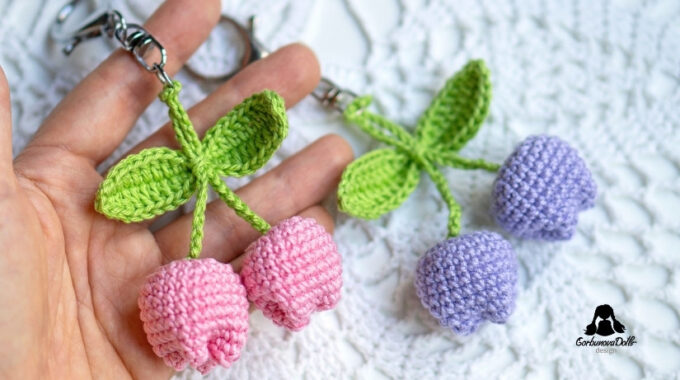
Crochet Tulip Keychain – Free Amigurumi Flower Pattern
Learn how to crochet a sweet tulip keychain with this free amigurumi flower pattern and step-by-step tutorial. This quick crochet keychain is a lovely small project for handmade gifts, bag charms, party favors, craft fair items, or simply using up leftover yarn from your stash.
Before we begin, thank you for visiting GorbunovaDolls – a place where I share detailed amigurumi patterns, crochet doll designs, and selected free tutorials from talented designers, translated with permission.

Pin this tulip keychain pattern to your crochet board so you can easily find it when you’re ready to make a quick handmade gift.
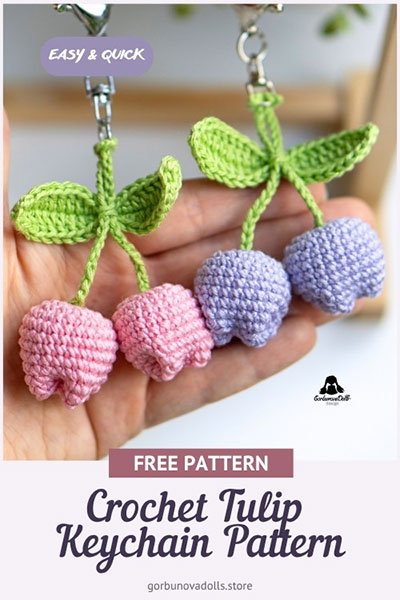
This little crochet tulip keychain is simple, cheerful, and very satisfying to make. It works beautifully as a bag charm, a small spring gift, a Mother’s Day surprise, or a cute handmade accessory for your keys.
The pattern includes written instructions for the tulip flower, leaves, stem, and assembly. I also prepared my own step-by-step photos for this tutorial, so you can follow the finishing process more easily.
Designer Credit
This free tulip keychain pattern was originally created by @julia_knitting11 and is shared here with her kind permission. I translated and prepared the instructions in English, and I photographed my own making process to help you follow the tutorial step by step.
If you enjoy this free English translation and photo tutorial, you can support my work with a small Ko-fi donation. Thank you!
Pattern Details
- Skill Level: Beginner-friendly / Easy
- Finished Size: depends on your yarn and hook size
- Crochet Terms: US terms
- Construction: the tulip is crocheted in rounds, lightly stuffed, sewn closed, and attached to a stem, leaves, and keychain clasp
- Best For: quick gifts, bag charms, spring makes, craft fair items, and small handmade accessories
- Original Designer: @julia_knitting11
- English Translation & Tutorial Photos: GorbunovaDolls

Materials You’ll Need
This section may contain affiliate links, including Amazon affiliate links. If you purchase through these links, I may earn a small commission at no extra cost to you. Thank you for supporting my free patterns.
You can use any smooth yarn with a crochet hook that matches your yarn weight. Keep in mind that thicker yarn will create a larger keychain, while thinner yarn will make a smaller and more delicate tulip.
For the sample, YarnArt Jeans was used – a Sport/Fine weight cotton-acrylic blend made of 55% cotton and 45% acrylic. Each skein is 50 g / 160 m / 175 yds.
If you want to use a different yarn, choose a smooth cotton or cotton-blend yarn that gives you neat, tight stitches for amigurumi. The Yarn Substitution Tool is a helpful resource for finding yarns with a similar weight, fiber content, and texture.
You will need two yarn colors:
- one color for the tulip flower
- one color for the stem and leaves
You will also need:
- 2 mm crochet hook
- fiberfill stuffing
- keychain clasp or carabiner
- yarn needle
- scissors
- stitch marker
Gauge and Size Notes
Gauge is not critical for this pattern. The most important thing is to keep your stitches tight enough so the stuffing does not show through. Your finished tulip keychain may be larger or smaller depending on your yarn, hook size, and tension.
Crochet Abbreviations Used in This Pattern
This pattern is written in standard US crochet terms. You can also check my Crochet Abbreviations guide if you need help with any of the stitches.
| Abbreviation | Meaning |
|---|---|
| ch/chs | chain/chains |
| dc | double crochet |
| hdc | half double crochet |
| inc | increase (two single crochets in one stitch) |
| sc | single crochet |
| sl st | slip stitch |
| st/sts | stitch/stitches |
| […] x | repeat the instructions in brackets x times |
| (…) | total number of stitches in the round |
Pattern Notes
- Crochet the tulip in continuous rounds.
- Use a stitch marker to mark the first stitch of each round.
- Stuff the flower lightly before sewing it closed.
- The stem is made as a simple chain.
- The leaves are crocheted around both sides of a foundation chain.
- You can adjust the stem length by making more or fewer chains.
Love detailed amigurumi patterns?
If you enjoy cute crochet projects like this one, you may also love my premium amigurumi doll patterns. Each PDF pattern is carefully designed with clear step-by-step instructions, helpful photos, and a polished finished result in mind.


Pattern Instructions
Tulip
Make two tulip flowers. Work in continuous rounds using the flower color. Place a stitch marker in the first stitch of each round.
R1: Into the magic ring, 6 single crochets, then pull the yarn tail to close the ring (6)
R2: inc in each st around (12)
R3: [sc, inc] x 6 (18)
R4: sc, inc, [2 sc, inc] x 5, sc (24)
R5-11: sc in each st around (7 rounds, 24)
Fasten off the yarn, leaving a long tail of about 20 cm / 8 in for sewing the openings closed.
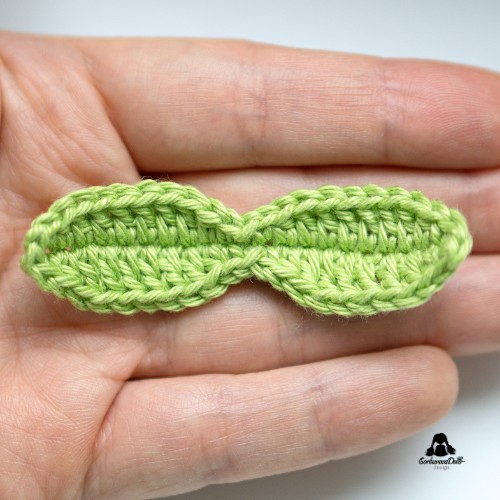
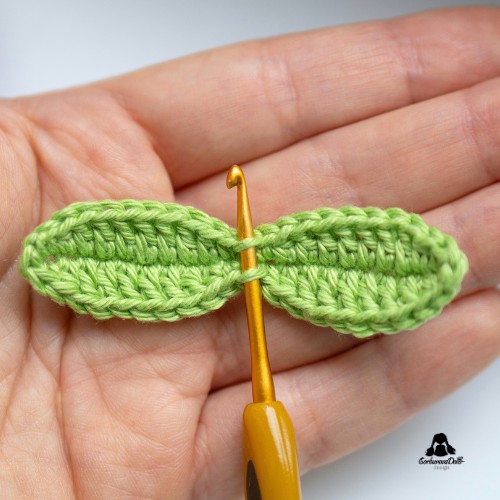
Leaves
Ch 22. Starting from the 2nd ch from the hook, work:
inc, hdc, 6 dc, hdc, sc, sl st, sc, hdc, 6 dc, hdc, 3 sc in the last ch.
Now work along the other side of the foundation chain:
hdc, 6 dc, hdc, sc, sl st, sc, hdc, 6 dc, hdc, sc.
Fasten off and weave in the ends.
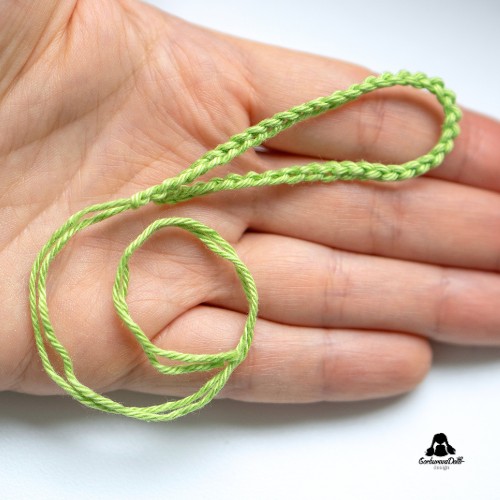
Stem
Leave a yarn tail of about 20 cm / 8 in before starting the chain. This tail will be used later to sew one tulip flower to the stem.
Ch 40. This chain forms the tulip stem. You can make it longer or shorter by adjusting the number of chains.
After finishing the chain, cut the yarn and leave another tail of about 20 cm / 8 in. Use this tail later to sew the second tulip flower to the stem.
Assembly
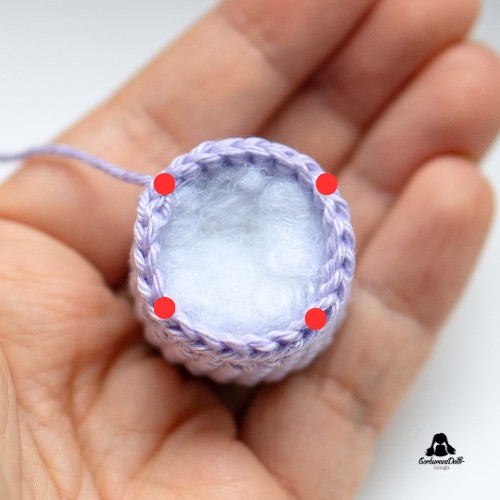
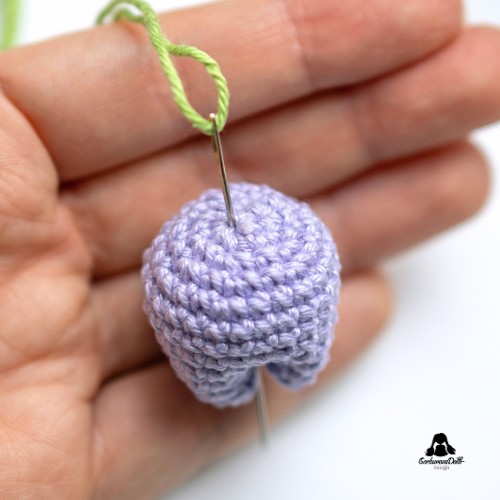
Lightly stuff the tulip flower with fiberfill. Sew the opening closed at the marked points, as shown in Photo 1.
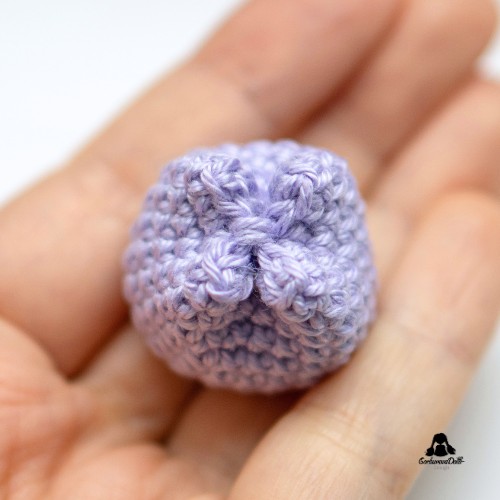
The closed tulip shape should look like Photo 2.
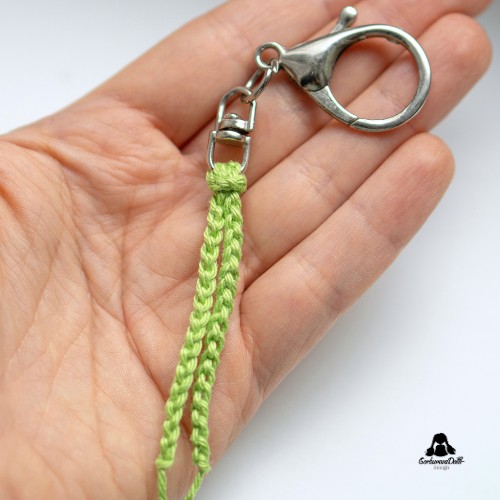
Attach the stem chain to the keychain clasp, as shown in Photo 3.
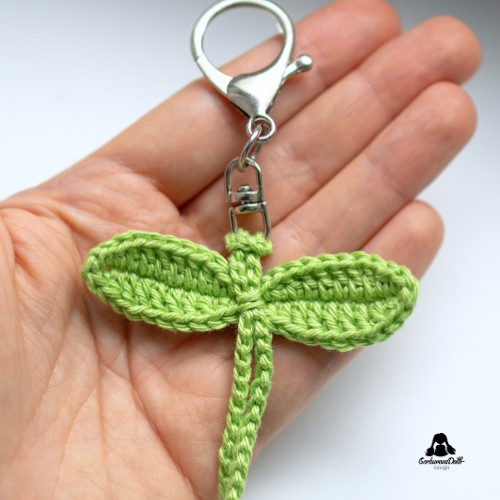
Insert your hook under the front loops in the middle section of the leaves, where you made the slip stitches. Pull the stem chain through the leaves, as shown in Photos 4 and 5.
Thread one yarn tail from the stem onto a yarn needle. Insert the needle through the bottom of one tulip flower and sew the stem securely in place.
Weave the yarn tail through the base of the tulip a few times to make the join secure, then hide the remaining tail inside the flower.

Repeat the same steps with the second yarn tail and the second tulip flower.
Your Crochet Tulip Keychain Is Finished!
Congratulations – your little crochet tulip keychain is ready! This sweet handmade accessory is perfect for keys, bags, gifts, party favors, or craft fair makes.
If you have any questions while following this tutorial, feel free to contact me here and I’ll do my best to help.
I hope you enjoyed this free amigurumi flower keychain pattern. If you make your own tulip, I’d love to see it! Tag me on Instagram @gorbunova.dolls or share your photo in my Facebook group, Ami & Hook Society.
Want to crochet something more detailed?
Explore my premium amigurumi doll patterns – beautifully structured PDF patterns with clear instructions, helpful step-by-step photos, and charming finished dolls you’ll be proud to make.
Pattern Credit & Permissions
This pattern was originally designed by @julia_knitting11 and is shared here as an English translation with the designer’s permission. Please do not copy, repost, translate, or redistribute this pattern without permission from the original designer.


Comments (0)