How to Do an Invisible Decrease in Crochet
How to do an invisible decrease in crochet is a question many beginners and even experienced crocheters ask when they want cleaner, smoother shaping, especially in amigurumi or tightly stitched projects. Unlike the standard decrease, which can leave noticeable gaps or bumps, the invisible decrease makes your work neater and more refined. In this tutorial, you’ll learn step by step how to do this simple but powerful technique.
Please kindly Pin my image before we start as it really helps. Thank you in advance!


How to Do an Invisible Decrease in Crochet
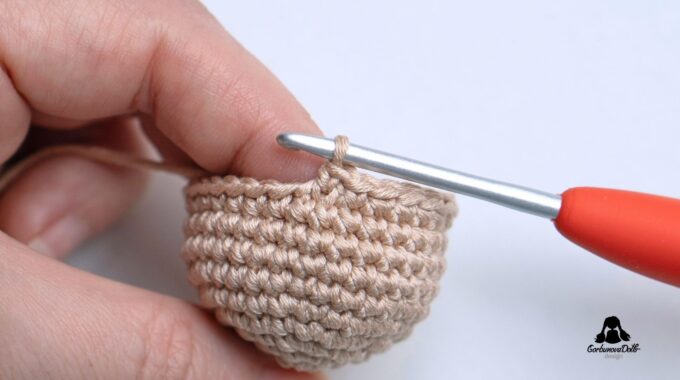
Step 1. To begin the invisible decrease crochet, insert your hook into the front loop only of the next stitch, and then into the front loop of the following stitch – so you’re working through two front loops total. Photo 1 (black arrows) shows exactly where to insert the hook. After this step, you will have three loops on your hook, as seen in Photo 2. If you’re not sure how to crochet through the front loops only (FLO), check out this tutorial – it covers this essential part of the technique.

Step 2. After inserting your hook into the front loops of the next two stitches, yarn over as shown in Photo 3.
Note: If you use the traditional V-shaped single crochet stitch, make a yarn over (YO) as usual. However, if you crochet using the X-shaped single crochet stitch, you should use a yarn under (YU) instead. This small difference helps maintain an even and neat stitch appearance. To learn more about the differences between these two crochet methods, check out this tutorial.
Step 3. Then pull the yarn through the first two loops on your hook. You should now have two loops remaining on the hook, as shown in Photo 4.

Step 4. Wrap the yarn over the hook again (photo 5) and pull through the remaining two loops on the hook. You have now completed one invisible decrease, as shown in Photo 6.
Note: At this step, you can also make a yarn under instead of a yarn over if you are using the X-shaped single crochet stitch.

Conclusion
And that’s it – now you know how to invisible decrease in crochet! It’s a simple trick that helps your stitches look cleaner and smoother, especially in projects like amigurumi. Just remember: work through the front loops only, and use yarn over or yarn under depending on your crochet style. Don’t worry if it feels a bit tricky at first – with a little practice, it’ll become second nature.
Keep practicing, have fun, and happy crocheting!


Comments (0)