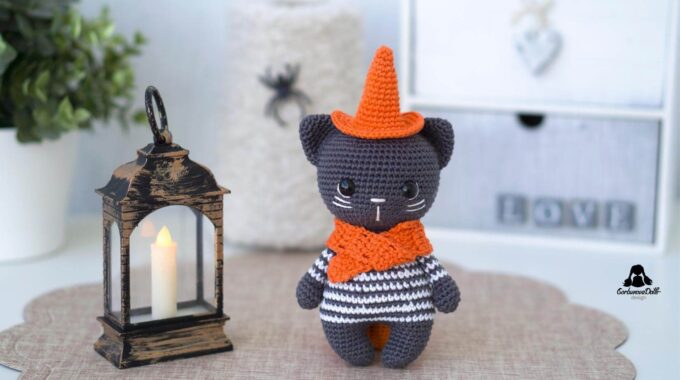
Free Crochet Cat Pattern – Mini Amigurumi Toy
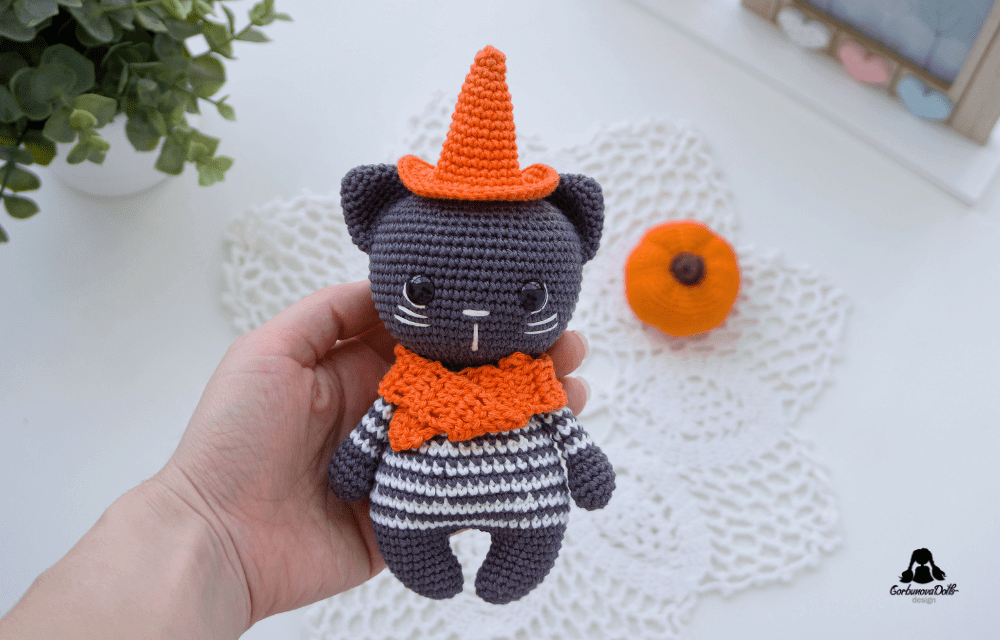
Would you like to create a delightful crochet cat? Look no further as this adorable feline is fairly easy to make, with its body, arms, and head all forming one piece. Just follow the instructions in this Free Crochet Cat Pattern and start your adventure.
This post may contain affiliate or referral links. As an Amazon Associate, I may earn a commission from qualifying purchases.
For those who are unfamiliar with the term, amigurumi refers to the art of crocheting small stuffed creatures. It’s a popular craft that allows individuals to showcase their creativity and create cute and cuddly companions. Whether you’re an experienced crafter or just starting out, this free crochet animal pattern is perfect for all skill levels.
Materials used in this Free Crochet Cat Pattern
- Yarn in gray, white, and orange colors, suitable for a 3.5 mm hook.
- Size 2.5 mm crochet hook. This is my absolute favorite crochet hook I recommend to everyone.
- Poly-Fil Fiberfill stuffing.
- 10 mm black safety eyes.
- Embroidery floss in white color.
- Yarn needle, stitch marker, pins and scissors.
What did I use?
Schachenmayr Catania, sport weight yarn, 100% Cotton, 1.76 ounces = 137 yards/50 grams = 125 meters. Colors: 00105 (white for body), 00429 (gray for body), 00189 (orange for hat and scarf).
Please kindly Pin my image before we start as it really helps. Thank you in advance!

Gauge and Measurements
Gauge is not important for this Free Crochet Cat Pattern, you can easily adjust the size of your toy by using smaller or larger hook and different types of yarn.
Made from listed yarn on a 2.50 mm crochet hook, the finished toy measures 7.08 inches (18 cm) tall with a hat. For those aiming for the same size, this gauge can serve as a reference: 10 stitches and 10 rows in single crochet measure 3.5 x 3.5 cm (1.37 x 1.37 inches).

Abbreviations
Here are the crochet abbreviations used in the Free Amigurumi Crochet Cat Pattern. The resource you may find helpful in following this pattern: Crochet Abbreviations.
| Abbreviation | Meaning |
|---|---|
| ch | chain |
| st | stitch |
| sl st | slip stitch |
| sc | single crochet (e.g. 3 sc = crochet in next 3 stitches) |
| dc | double crochet |
| inc | increase (2 sc in one stitch) |
| invdec | invisible decrease (single crochet two stitches together through front loops only (see tutorial) |
| BLO | back loop only (see tutorial) |
| (…) | total number of stitches in the round |
| […] x n | repeat instructions in brackets n times |
PDF Pattern
The PDF version of this pattern is a great solution for those who want to print the instructions and work offline, or just want to support my work. You can find the PDF pattern in my shop.
Arms
Start with gray yarn. Work in rounds with a stitch marker. It can be a colored pin or thread of contrasting color. Pin a marker to 1st stitch of a round. Every new round must be started with a stitch at the marker.
R1: start 6 Sc in a magic ring (6)
R2: 1 Inc in all sts (12)
R3: [3 Sc, 1 Inc] x 3 (15)
R4-5: 1 Sc in all sts (15)
R6: 5 InvDec, 5 Sc (10)
R7: 1 Sc, connect yarn in white color at the last step of next sc (Photos 1 and 2), 8 Sc (10)

R8: 1 Sc, connect yarn in gray color at the last step of next sc (Photos 3 and 4), 8 Sc (10)

R9-14: Repeat Round 7 and 8 alternately 3 times more.
R15: 1 Sc, connect yarn in white color at the last step of next sc, 8 Sc (10), fasten off gray yarn.
Remove marker and stuff bottom part of the arm. Turn the detail so that the invisible decreases made in Round 6 are facing you. Press both sides of the arm’s open end together as shown on Photo 5. Before your start Round 16 crochet 2 Sc more to the outer side stitch.
R16. Ch1, insert the hook through the corresponding stitches on both sides of the arm’s open end to crochet them together with 5 Sc (Photo 6).

Break the yarn (Photo 7) and weave in ends. Crochet the second arm in the same way (Photo 8).

You may also like – Crochet Toy Pattern Bundle Three in One.

Legs
Use gray yarn. Crochet in a continuous spiral.
R1: start 6 Sc in a magic ring (6)
R2: 1 Inc in all sts (12)
R3: [1 Sc, 1 Inc] x 6 (18)
R4:1 Sc, 1 InvDec, 7 Sc, 1 Inc, 6 Sc, remove marker, 1 InvDec (17)
R5: 1 InvDec (place marker), 7 Sc, 2 Inc, 6 Sc (18)
R6: 1 Sc in all sts (18)
R7: 1 InvDec, 8 Sc, 1 Inc, 7 Sc (18)
R8: 1 Sc in all sts (18)
Enlarge the loop and break the yarn. Crochet the 2nd leg, but do not break the yarn this time.

Body
Stuff while you go. Go ahead on the 2nd leg to connect both legs into a body.
R1: 1 Sc, Ch 4 (= Ch4-chain), take the 1st leg (Photo 10), place enlarged loop back on your hook and tighten (Photo 11),

insert the hook into the next st on the 1st leg, yarn over, pull up a loop (3 loops on the hook, Photo 12), yarn over and pull the yarn through all loops on the hook (Photo 13),

then 17 Sc over the remaining sts on the 1st leg, 4 Sc along the ch4-chain, 18 Sc around the 2nd leg, 4 Sc into the loops on the other side of the ch4-chain (44, Photos 14 and 15). Next stitch will be a new beginning of the following rounds.

R2: 1 Sc (this st is hard to crochet therefore use a smaller hook for convenience, place marker), 17 Sc; in the middle: 1 Inc, 2 Sc, 1 Inc; on the other leg: 12 Sc, 1 Inc, 5 Sc; in the middle: 1 Inc, 2 Sc, 1 Inc (49)
R3: 1 Sc in 48 sts, change color to gray in the last step of the last sc, 2 Sc (50)
R4: 1 SC in 48 sts, connect yarn in gray color at the last step of the last sc, 2 SC (50)
R5: 1 Sc, 1 Inc, 16 Sc, 1 Inc, 6 Sc, 1 Inc, 16 Sc, 1 Inc, 5 Sc, change color to white in the last step of the last sc, 2 Sc (54)
R6. 1 Sc in 52 sts, change color to gray in the last step of the last sc, 2 Sc (54), stuff legs
R7: [1 InvDec, 7 Sc] x 5, 1 InvDec, 1 Sc in 5 sts, change color to white in the last step of the last sc, 2 Sc (48)
R8: 1 Sc in 46 sts, change color to gray in the last step of the last sc, 2 Sc (48)
R9: 1 SC in 46 sts, connect yarn in white color at the last step of the last sc, 2 SC (48)
R10: [1 InvDec, 6 Sc] x 5, 1 InvDec, 4 Sc, change color to gray in the last step of the last sc, 2 Sc (42)
R11: 1 Sc in 40 sts, change color to white in the last step of the last sc, 2 Sc (42)
R12: 1 Sc in 40 sts, change color to gray in the last step of the last sc, 2 Sc (42)
R13: [1 InvDec, 5 Sc] x 5, 1 InvDec, 3 Sc, change color to white in the last step of the last sc, 2 Sc (36)
R14: 1 Sc in 34 sts, change color to gray in the last step of the last sc, 2 Sc (36)
R15: 1 Sc in 34 sts, change color to white in the last step of the last sc, 2 Sc (36)
R16: [1 InvDec, 4 Sc] x 5, 1 InvDec, 2 Sc, change color to gray in the last step of the last sc, 2 Sc (30)
R17: 1 Sc in 28 sts, change color to white in the last step of the last sc, 2 Sc (30)
R18: 1 Sc in 28 sts, change color to gray in the last step of the last sc, 2 Sc (30, Photo 16, back side of the toy)

Arms connection
For the following round, take care to attach arms symmetrically.
R19: 4 Sc (you may need a different number of sc, this will be clear when you finish this round), join the 1st arm: 5 Sc (work hooking through both sts of the body and the arm, Photo 17); front: 10 Sc; join the 2nd arm: 5 Sc; 6 Sc (30, Photos 18, 19). Fasten off white yarn.

R20: [1 InvDec, 1 Sc] x 10 (20)
R21.1 Sc in every st (20), continue crocheting a head without cutting the yarn.
Head
R1: [1 Inc, 1 Sc] x 10 (30)
R2: [1 Sc, 1 Inc] x 15 (45)
R3:1 Sc in every st (45)
R4: [4 Sc, 1 Inc) x 9 (54)
R5: [8 Sc, 1 Inc] x 6 (60)
R6-R17: 1 Sc in all sts (12 rounds)
Mark eyes with pins between round 11 and 12 with a distance of 11 stitches between pins (Photo 20). Insert safety eyes (Photo 21). Make sure you are happy with the placement before proceeding because once the washer is fixed to the rod of the eye, it cannot be removed.
R18: 4 Sc, 1 InvDec, [8 Sc, 1 InvDec] x 5, 4 Sc (54)
R19: [1 InvDec, 7 Sc] x 6 (48)
R20: 3 Sc, 1 InvDec, [6 Sc, 1 InvDec] x 5, 3 Sc (42), start stuffing
R21: [1 InvDec, 5 Sc] x 6 (36)
R22: 2 Sc, 1 InvDec, [4 Sc, 1 InvDec] x 5, 2 Sc (30)
R23: [1 InvDec, 3 Sc] x 6 (24)
R24: 1 Sc, 1 InvDec, [2 Sc, 1 InvDec] x 5, 1 Sc (18)
R25: [1 InvDec, 1 Sc] x 6 (12), stuff firmly
R26: 2 InvDec, close remaining stitches through the front loops as shown in the video.
Cut and pull the yarn through the last stitch completely, thread it onto yarn needle. Guide the yarn into front loops only of each remaining stitch from outside to inside. Fasten off the hole and hide the end of yarn inside the head (Photo 22).

Ears
Use gray yarn. Crochet in a continuous spiral.
R1: start 6 Sc in a magic ring (6)
R2: 1 Inc, 2 Sc, 1 Inc, 2 Sc (8)
R3: 2 Inc, 2 Sc, 2 Inc, 2 Sc (12)
R4:1 Sc, 2 Inc, 4 Sc, 2 Inc, 3 Sc (16)
R5: 1 Sc in all sts (16)
R6: 2 Sc, 2 Inc, 6 Sc, 2 Inc, 4 Sc (20)
R7: 3 Sc, 2 Inc, 8 Sc, 2 Inc, 5 Sc (24)
R8: 1 Sc in every st (24). Crochet 5 Sc more to the outer side stitch (you may need a different number of sc), cut the yarn, leaving a long end for sewing.
Crochet 2 details (Photo 23).

You may also like – Halloween Crochet Pattern Bundle 5 in 1.

Assembly
Place the ears symmetrically on the top of the head between round 13 and 23. Fasten them with pins as shown on Photos 24, 25 and 26.

Sew the ears with the ends of gray yarn that we left before (Photos 27 and 28). Fasten off and cut the yarn, hiding the ends inside the head.

Hat
Use orange yarn. Crochet in a continuous spiral.
R1: start 6 Sc in a magic ring (6)
R2: 1 Sc in all sts (6)
R3: [1 Sc, 1 Inc] x 3 (9)
R4: [2 Sc, 1 Inc] x 3 (12)
R5: 1 Sc in all sts (12)
R6: [3 Sc, 1 Inc] x 3 (15)
R7: 1 Sc in all sts (15)
R8: 2 Sc, 1 Inc, [4 Sc, 1 Inc] x 2, 2 Sc (18)
R9: 1 Sc in all sts (18)
R10: [5 Sc, 1 Inc] x 3 (21)
R11: 1 Sc in all sts (21)
R12: 3 Sc, 1 Inc, [6 Sc, 1 Inc] x 2, 3 Sc (24)
R13: 1 Sc in all sts (24)
R14: [3 Sc, 1 Inc] x 6 (30)
R15: 1 Sc in all sts (30)
R16: 1 Sc, 1 Inc, [2 Sc, 1 Inc] x 9, Sc (40)
R17: [3 Sc, 1 Inc] x 10 (50)
R18: 1 Sc in every st (50), 1 Slst in first st of the round, weave in end (Photo 29).

Scarf
Use orange yarn. Make a foundation chain of Ch 7. Work in turns.
R1. Start in 4th ch from the hook: 4 Dc, Ch 3 (counted as 1 Dc here and throughout), turn
R2. From 2nd st: 3 Dc, 1 Dc into top of ch 3 (5), Ch 3, turn
R3. From 2nd st (Photo 30): 3 Dc, 1 Dc into top of ch 3 (Photo 31), Ch 3, turn

R4-24. From 2nd st: 3 Dc, 1 Dc into top of ch 3, Ch 3, turn
R25. From 2nd st: 3 Dc, 1 Dc into top of ch 3. Weave in end (Photo 32).

Embroidering
Use straight stitches and embroidery floss in white color. Embroider whites of the eyes, nose and mustache with 6-strand of embroidery floss as shown on Photos 33 and 34.

Sew hat to the head. Tie the scarf around the cat’s neck.
Congratulations! Your little cat is ready! I hope you have fun. I’d love to see your toy, be sure to tag me @gorbunova.dolls on Instagram. If you are on Facebook join my group Ami & Hook Society and share a photo! If you enjoyed this pattern, subscribe for more!
If you have any questions about this Free amigurumi crochet cat pattern, please contact me here, and I’ll get right back to you.
Copyright
©Gorbunovadolls. All rights reserved. This free crochet cat pattern may not be published, resold, reproduced, shared, translated, or altered without prior permission in writing from the author. For more details, please visit the Copyright and Intellectual Property Rights.
Selling Finished Items
The design and pattern are copyrighted and may not be reproduced or redistributed for resale! You may sell finished items made from this pattern. You are welcome to make as many items as you like for personal use or charity. However, commercial reproduction of the pattern itself is strictly prohibited.




Thank you so much for such a cute pattern 💚