
Free Crochet Pumpkin Pattern for Halloween
If you’re on the hunt for an adorable and Free Crochet Pumpkin Pattern, you’re in luck! Dive into this delightful Halloween crochet pattern featuring a charming fall pumpkin. It’s just what you need to spruce up your home decor for the autumn season or to add a festive touch to your Halloween celebrations. Whether you’re creating a cozy ambiance for crisp fall evenings or decking out your space for a spooktacular Halloween bash, these crochet pumpkins are sure to bring warmth and charm to any setting.
You can use different types of yarn to change the size of your pumpkin. Choose a DK or Sport weight for a smaller pumpkin and a bulky or a super-bulky weight yarn for a larger pumpkin. Be sure to use a crochet hook one or two sizes smaller than recommended. This creates a tighter fabric that securely holds the stuffing without visible gaps.
This post may contain affiliate or referral links. As an Amazon Associate, I may earn a commission from qualifying purchases.
Please take a moment to pin my image before we begin – it really helps! Thank you so much!

Materials
- Yarn in orange, brown, light and dark green, and yellow;
- Size 2.5 mm crochet hook. This is my absolute favorite crochet hook I recommend to everyone;
- Poly-Fil Fiberfill stuffing;
- Yarn needle, stitch marker, pins, and scissors;
- Optional: small button for decoration.
What did I use?
Very soft sport weight yarn – Yarn Art Jeans from Turkey (55 % Cotton, 45% Acrylic), length: 160 mt/174 yards, weight: 50 gr/1.76 oz.


Abbreviations
Here are the crochet abbreviations used in the free crochet pumpkin pattern. Note that instructions are written in US terms. The resource you may find helpful in following this pattern: Crochet Abbreviations.
| Abbreviation | Meaning |
|---|---|
| CH | chain |
| St | stitch |
| SC | single crochet (e.g. 3 SC means to crochet SC in next 3 stitches) |
| HDC | half double crochet |
| TR | treble crochet |
| INC | increase (2 SC in one stitch) |
| HDC DEC | half double crochet decrease = yo, insert hook into 1st stitch, yo, pull up a loop, insert hook into 2nd stitch, yo, pull up a loop (4 loops on hook), yo, pull through all 4 loops on hook |
| INV DEC | invisible decrease = single crochet two stitches together front loop only (see tutorial) |
| BLO/FLO | back/front loop only (see tutorial) |
| Yo | yarn over |
| (…) | total number of stitches in the round |
If a sequence appears in brackets followed by a multiplication sign, for example (3 SC, INC) * 3, it means you should repeat the entire sequence three times: 3 SC, INC; 3 SC, INC; 3 SC, INC.
Love Halloween crocheting? Check out these free patterns.

Gauge and Measurements
A 10-stitch by 10-row swatch in single crochet should measure 3.5 × 3.5 cm (1.38 × 1.38 inches). The finished pumpkin measures 3.93″ (10cm) wide and 2.36″ (6cm) tall.
PDF Pattern
The PDF crochet pattern is a great solution for those who want to print the instructions and work offline, or just want to support my work. You can find it in my shop.

You may also like – Halloween Crochet Pattern Bundle 5 in 1.

Free Crochet Pumpkin Pattern
Work in rounds with a stitch marker. It can be a colored pin or thread of contrasting color. Pin a marker to 1st stitch of a round. Every new round must be started with a stitch at the marker. Start with a stem and brown yarn.
R1: 6 SC in magic ring (6)
R2-5: SC in all st (6)
R6: INC in all st (12)
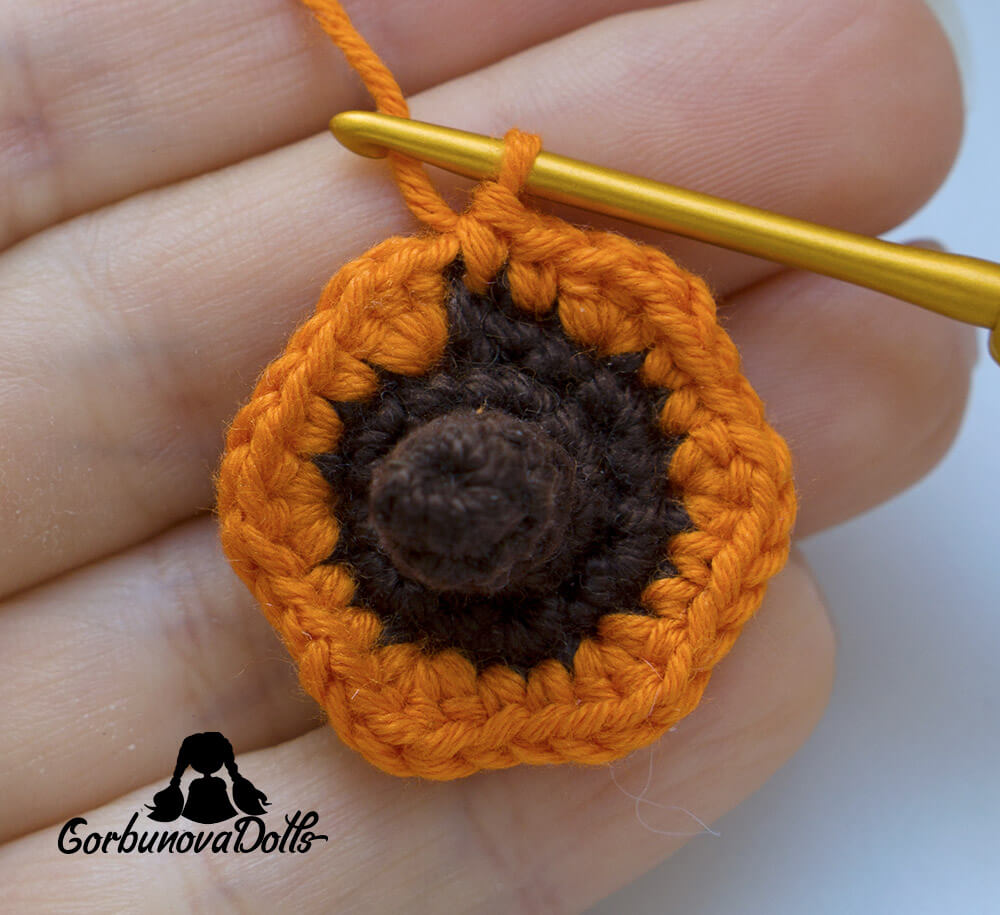
R7: (SC, INC) * 6 (18), connect orange yarn at the last step of the last sc (Photos 1 and 2)

R8: (3 HDC in one st, 2 SC) * 6 (30, Photo 3)
R9: (2 HDC in one st * 3, 2 SC) * 6 (48, Photo 4)

R10: (2 HDC in one st * 6, 2 SC) * 6 (84, Photo 5)
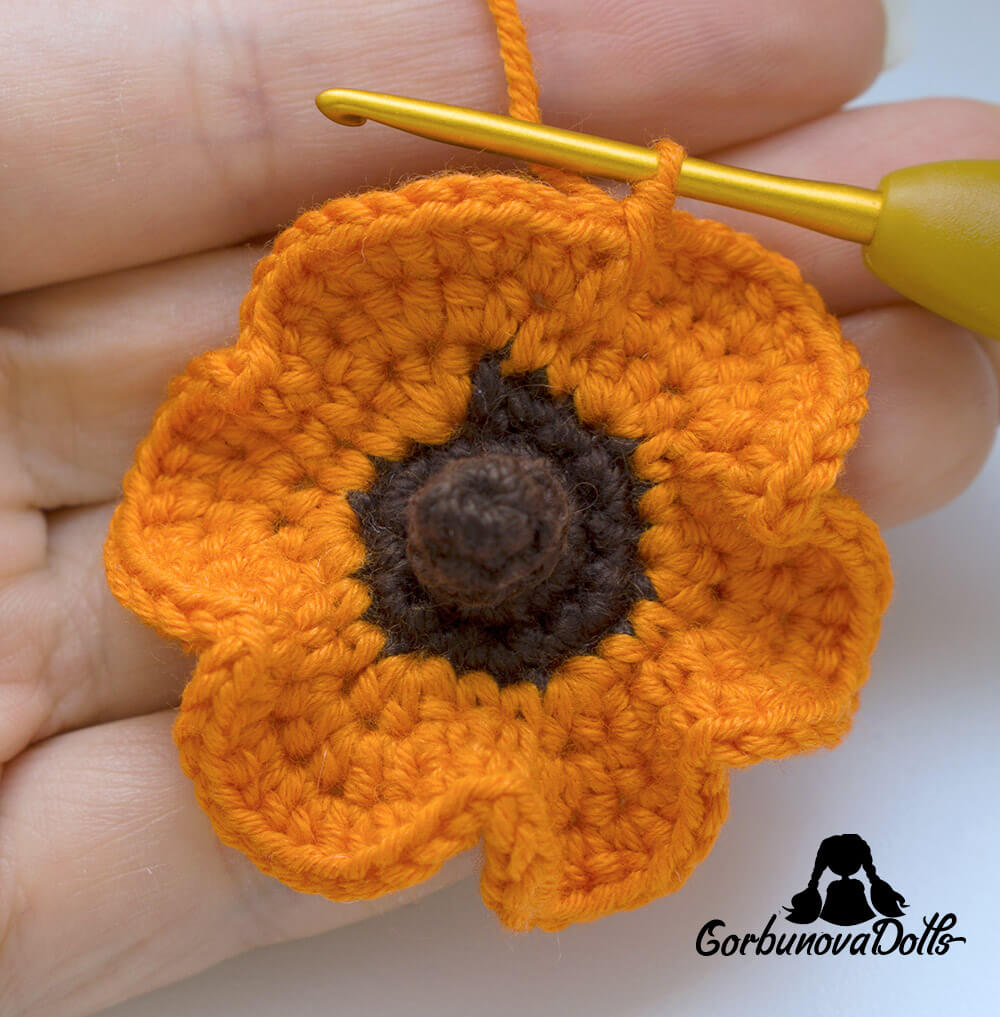
R11: (skip one st, 10 HDC, 2 HDC in one st, 2 SC) * 6 (84, Photo 6)

R12: ([2 HDC in one st, 2 HDC] * 4, 2 SC) * 6 (108)
R13: (skip one st, 14 HDC, 2 HDC in one st, 2 SC) * 6 (108)
R14: (16 HDC, 2 SC) * 6 (108)
R15: (skip one st, 14 HDC, 2 HDC in one st, 2 SC) * 6 (108)
R16: (16 HDC, 2 SC) * 6 (108)
R17: (skip one st, 14 HDC, 2 HDC in one st, 2 SC) * 6 (108)
R18: (16 HDC, 2 SC) * 6 (108)
R19: (skip one st, 14 HDC, 2 HDC in one st, 2 SC) * 6 (108)
R20: (16 HDC, 2 SC) * 6 (108, Photo 7)

R21: (skip one st, 14 HDC, 2 HDC in one st, 2 SC) * 6 (108)
R22: (16 HDC, 2 SC) * 6 (108)
R23: (skip one st, 14 HDC, 2 HDC in one st, 2 SC) * 6 (108)
R24: (16 HDC, 2 SC) * 6 (108)
R25: (skip one st, 14 HDC, 2 HDC in one st, 2 SC) * 6 (108)
R26: (16 HDC, 2 SC) * 6 (108)
R27: ([HDC Dec, 2 HDC] * 4, 2 SC) * 6 (84)
R28: (6 HDC Dec, 2 SC) * 6 (48, Photos 8 and 9)


R29: (3 HDC Dec, 2 SC) * 6 (30)
R30: (3 SC, INV DEC) * 6 (24)
R31: (2 SC, INV DEC) * 6 (18, Photo 10). Stuff the bulging parts firmly, connect brown yarn at the last step of the last stitch.

R32: (SC, INV DEC) * 6 (12)
R33: 6 INV DEC (6), cut the yarn leaving a long end, thread the needle, gather and secure stitches as shown in the video.
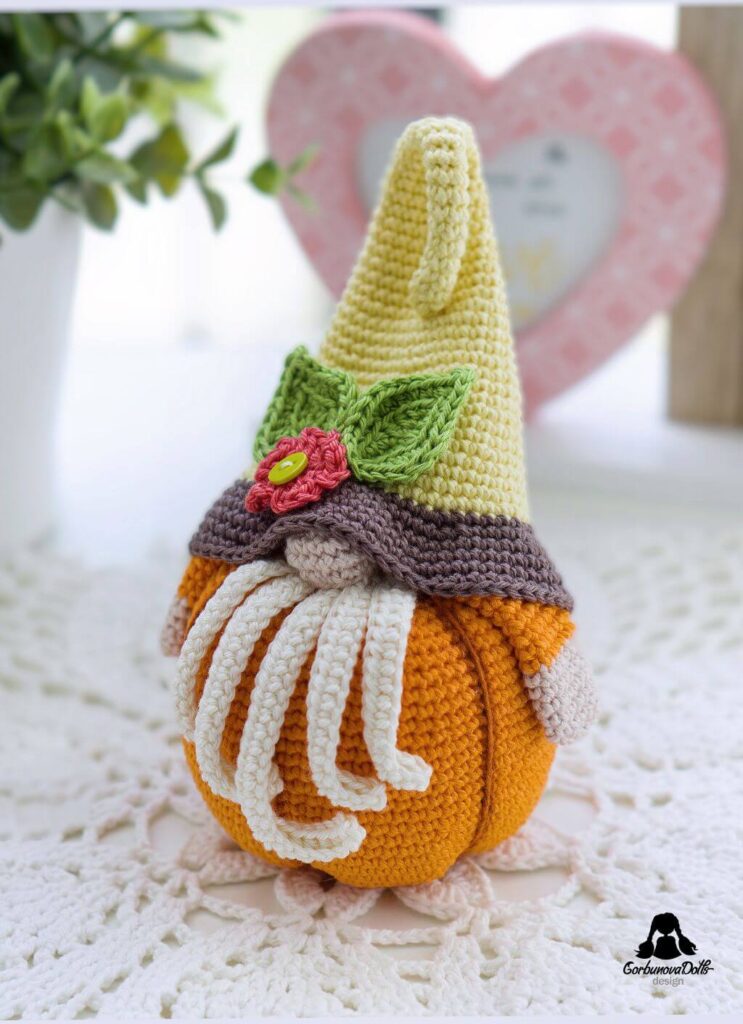
The pumpkin is ready (Photos 11 and 12).

Leaves
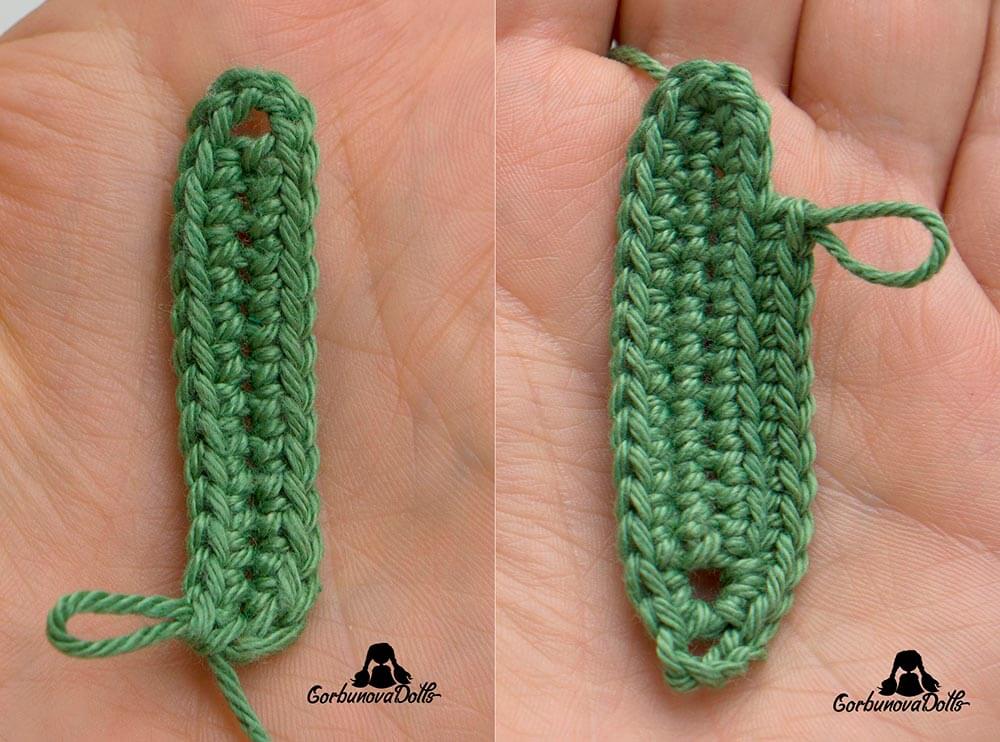
Ch14 with green yarn
R1: start from 2nd ch: 12 SC, in last ch crochet: SC, CH4, SC; along the other side of the chain: 12 SC (Photo 13)
R2: 3 SC in one st, 12 SC, in the chain of 4ch’s: 2 SC, CH4, 2 SC; BLO 10 SC (Photo 14)
R3: CH1, turn, from second st: FLO: 11 SC; in the chain of 4ch’s: 2 SC, CH4, 2 SC; FLO 12 SC; Ch1, turn (Photo 15)
R4: from 2nd st: BLO 13 SC, in the chain of 4ch’s: 2 SC, CH4, 2 SC; BLO 10 SC, Ch1, turn
R5: from 2nd st: FLO 11 SC, in the chain of 4ch’s: 2 SC, CH4, 2 SC; FLO 11 SC, Ch1, turn (Photo 16)

R6: from 2nd st: BLO 12 SC, in the chain of 4ch’s: 2 SC, CH4, 2 SC; BLO 10 SC, Ch1, turn
R7: from 2nd st: FLO 11 SC, in the chain of 4ch’s: 2 SC, CH4, 2 SC; FLO 11 SC, Ch1, turn (Photo 17)
R8: from 2nd st: BLO 12 SC, in the chain of 4ch’s: 2 SC, CH4, 2 SC; BLO 9 SC, Ch1, turn
R9: from 2nd st: FLO 10 SC, in the chain of 4ch’s: 5 SC; FLO 10 SC, weave in end (Photo 18)

Crochet the second leaf in different green color in the same way (Photo 19)

Vines
Small with light green color:
Ch35, from second st: 2 SC in each ch * 29, 5 SC, cut the yarn leaving a tail approx 6″ (15cm) long for sewing
Medium with light green color.
Ch40, from second st: 2 SC in each ch * 34, 5 SC, cut the yarn leaving a tail approx 6″ (15cm) long for sewing
Large with dark green color.
Ch50, from second st: 2 SC in each ch * 44, 5 SC, cut the yarn leaving a tail approx 6″ (15cm) long for sewing

Flower
With yellow yarn
In magic ring crochet: * Ch4 (Photo 21), 2 TR (Photo 22),

Ch4, SC (Photo 23). Repeat from * 4 times (Photo 24),

pull one end of the loop to tighten it (Photo 25), cut the yarn leaving a tail approx 6 inches (15cm) long for sewing.

Fasten leaves, vines, and flower to the pumpkin with pins and sew them on.

Congratulations! Your pumpkin is ready! I hope you have fun. Don’t forget to share your final result on Instagram using #GorbunovaDolls hashtag. If you enjoyed the Free Crochet Pumpkin Pattern, subscribe for more!

Copyright
©Gorbunovadolls. All rights reserved. This free crochet pumpkin pattern may not be published, resold, reproduced, shared, translated, or altered without prior permission in writing from the author. For more details, please visit the Copyright and Intellectual Property Rights.
Selling Finished Items
The design and pattern are copyrighted and may not be reproduced or redistributed for resale! You may sell finished items made from this pattern. You are welcome to make as many items as you like for personal use or charity. However, commercial reproduction of the pattern itself is strictly prohibited.


Hello there. It’s a great pumpkin. It’s nice that it’s free too. thank you. 🥰
When someone writes an piece of writing he/she keeps the image of a user
in his/her brain that how a user can know it. Thus that’s
why this post is great. Thanks!
Hi,
I was wondering if there is a way to adjust the size of the pumpkin?
Thanks!
Yes, of course. First of all, you can do it with different yarn weight and hook size. Also, you can continue crocheting more stitches after round 12 to make the pumpkin wider, or the opposite of skipping a few rounds.
Hi, I’m having trouble with row 12 of the pumpkin. My count is all off, and i’ve frogged and retried it 3 times. What am I doing wrong?
Hi! Count stitches before R12, there should be 84 stitches.
You must crochet the following in row 12
R12: [2 HDc in one st, 1 HDc in one st x 2 times] * 4, 2 SC; [2 HDc in one st, 1 HDc in one st x 2 times] * 4, 2 SC; [2 HDc in one st, 1 HDc in one st x 2 times] * 4, 2 SC; [2 HDc in one st, 1 HDc in one st x 2 times] * 4, 2 SC; [2 HDc in one st, 1 HDc in one st x 2 times] * 4, 2 SC; [2 HDc in one st, 1 HDc in one st x 2 times] * 4, 2 SC (108)
Thank you so much for the help! Turns out, I was adding stitches and it threw everything off. I finished the pumpkin though and it’s so cute!
Thank You for a great easy to follow pattern that is free. I only wanted the leaves and vines to go on my knitted pumpkin but your pattern is so easy to follow I am going to make this crochet one too. Excellent Thank you